![]()
Ice cream is a frozen dessert, usually made from dairy products, such as milk and cream, and often combined with fruits or other ingredients and flavours. A scoop of ice cream never fails to be the best comfort food any time of the day. Ice cream is a well loved dessert by many people around the world. Starting your own home-made ice cream business is a good business idea to earn extra income.
Homemade Ice Cream
Materials:
bowls
casserole
grater
large whisk
measuring spoons and cups
pocket-type thermometer
steel paddle
sieve screen
stainless steel
container
weighing scale
wooden bucket
wooden ladle
1/4 ice block
7 kg table salt
Ingredients:
For the ice cream
1 kg white sugar
1/2 kg skimmed milk
1/2 kg butter milk powder
600 g cassava flour
2 leaves pandan
4 pcs egg yolks
2 cans 300 ml condensed milk
1 can 300 g cream
1/2 bar cheese
1 kg grated coconut
2 tablespoons food coloring (egg yellow)
3 tablespoons vanilla
7 teaspoons or 34.5ml rhum or brandy
For mango marmalade flavoring:
1 1/2 kg ripe mango
1/2 cup white sugar
1 teaspoon calamansi extract
Procedure:
Step 1: Measure all the required ingredients and put them in individual containers.
Step 2: Extract coconut milk from the grated coconut using 4 cups of water. This will be your first extraction – a substance that’s called kakang gata in Filipino. Set it aside. Then, extract more coconut milk from the same grated coconut, this time using 8 cups of water. To remove the coconut bits from it, filter the coconut milk after the extraction. Set the second extraction aside too.
Step 3: Separate the egg yolks from the egg white – we'll only need the yolks. Beat the egg yolks, then mix them with the second extraction of coconut milk.
Step 4: Slowly add the skimmed milk and the buttermilk powder while mixing with a whisk. Some ice cream makers use either skimmed milk or buttermilk powder, but if you want to make your ice cream a bit more special, you can mix the two powders. You just need to maintain the required 1-to-1 proportion. After blending the mixture, set it aside. (Mixing milk and egg gives rise to custard.)
Step 5: Dissolve the cassava flour in 2 cups of water. Once the cassava flour is completely dissolved, filter it using a sieve or cheesecloth. Also set aside.
Step 6: Prepare the stainless steel container by spreading ¼ kg of white sugar at the bottom, which will help to avoid unnecessary coagulation of the cream. Then put the container inside the wooden bucket.
Step 7: Start the scalding process by boiling a gallon of water containing twisted pandan leaves for 5 minutes. Scalding, which helps dissolve the sugar, infuses the other flavors evenly, and improves the texture. It makes the ice cream creamier and smoother.
Step 8: After boiling the water, take out the pandan leaves and pour the water into the stainless steel container. Also pour in the cassava flour mixture and, using the steel paddle, continuously stir until the sugar dissolves and the mixture achieves a viscous (thick) consistency.
Step 9: Add the kakang gata as you continuously stir the mixture. Also pour in the custard mixture and stir constantly until it attains a paste-like viscosity. Dissolve the food color in a little bit of water, then also add to the mixture. Continue mixing until you achieve the right viscosity.
Step 10: To chill, cover the stainless steel container and put crushed ice in the wooden bucket. The ice should surround the stainless steel container and be above the level of the mixture inside the container. The chilling stage will only start when the temperature of the mixture reaches 4
oC to 0
oC. Chill for 2 hours or overnight.
Step 11: While waiting for the ice cream to be chilled, prepare the mango marmalade flavoring. Put 1 ½ kg minced ripe mango in a casserole together with ½ cup white sugar and a teaspoon of calamansi extract. Simmer in medium to low fire until the mango mixture becomes a thick syrup. Stir the marmalade to avoid scorching. Set aside to cool.
Step 12: After chilling the ice cream overnight, you can now freeze it by putting more ice in the wooden bucket. You need to put the crushed ice and the rock salt alternately. Using the paddle, compact the ice and the salt each time you put in more ice. Compacting lessens the air gaps that cause the ice to melt faster.
During the first freezing stage, the temperature should further drop to -18
oC to -20
oC. While freezing the ice cream, paddle the outer part of the mixture to prevent the frozen mixture from adhering to the sides before it can be stirred. The stirring process allows the cream mixture to expand.
Step 13: While still in the freezing stage, get the steel handbeater and start stirring the ice cream to let it expand. Once it expands to half of the container, mix in the following while continuously stirring the cream mixture: ¾ kg of white sugar together with the grated cheese, mango marmalade, condensed milk, cream, and vanilla.
Step 14: Add crushed ice and salt to the wooden bucket whenever necessary. As you stir the cream mixture, you will notice that the consistency will become thicker and creamier. You will also notice that it is expanding.
Step 15: Once the cream expands up to the brim of the container, add the rhum or brandy. Make sure to stir the mixture down to the bottom to distribute the flavor and the other ingredients evenly. Taste and adjust if necessary.
Step 16: You may now pack the ice cream in small containers like pint containers, small cups, half-gallon or gallon containers, and freeze the cream in these containers. Or, you may simply put the ice cream in the stainless steel container for final freezing.
During the final freezing stage, you need to cover the container tightly and add more crushed ice and salt in the bucket as well as on top of the container. Let it stay for 2 hours or until frozen.
Now your ice cream is ready for consumption. Keep it frozen until it is ready for serving. The shelf life of this ice cream product is 7 to 10 days, depending on the temperature fluctuations. If you can maintain the temperature between -18
oC and -25
oC, the shelf life of the ice cream would be longer and the quality would be better.
![vanilla ice cream]() French Vanilla Ice Cream
Ingredients:
French Vanilla Ice Cream
Ingredients:
1 recipe custard base
1 vanilla bean (split)
Procedure:
1)Follow the first step in the custard base recipe and combine the milk cream and sugar (do not start heating).
2)Next, you need to scrape out the seeds of the vanilla bean (they contain all that delicious and aromatic vanilla flavor). First, just split the vanilla bean in half, lengthwise. Then scrape the seeds out with a knife and combine them with the milk cream and sugar.
3)Now just follow the rest of the custard base recipe, and that’s it!
*Note, if you do not have any vanilla bean on hand, this recipe can also be made with vanilla extract. If you decide to use vanilla extract, just follow the recipe for custard base, and when you are finished, stir in one tablespoon of vanilla extract. Top it with fruit, nuts, chocolate, candy, etc.
Custard Ice Cream Base
The ice cream base is the essential part of what makes ice cream really creamy and luxurious.
Ingredients:
1 cup heavy whipping cream
1/2 cups of whole milk
1/3 cup sugar
1 tablespoon condensed milk
3 egg yolks
*optional: 1 teaspoon flour (helps to stabilize the ice cream)
*optional: 1 teaspoon hard liquor for flavor and stabilization
Cooking utensils:
a medium saucepan
two medium sized bowls
a strainer
measuring cups and spoons
1) Heat the milk, cream, condensed milk, and 1/3 cup sugar in a saucepan, until sugar is dissolved and milk is steaming.
2) Whisk the egg yolks in a separate bowl. Add one cup of the hot milk mixture to the egg yolks (making sure to poor slowly and stir / whisk). Then, pour the mixture back into the sauce pan while continually stirring the mixture. The stirring prevents the eggs from reaching a too high temperature and becoming scrambled eggs.
3) Cook the mixture over medium heat from two to seven minutes. You will know it is done when the mixture coats the back of a wooden spoon and leaves a clean streak when you drag your finger through it. You will also see steam rising from the mixture. Don't worry if you see that some of the mixture has thickened on the bottom of the pan, this will be strained out.
4) Chill the mixture and then add it to your ice cream maker.
Sources: entrepreneur.com.ph, make-ice-cream.com

 These are what you need in preparing your own beef bacon at home.
Raw materials:
20.000 kg Beef silverside tip or brisket (meat 60-80%)
Bones and soft bones are removed
10 mm layer of body fat is left on silverside tip
Brine composition:
8.800 kg Ice water
1.200 kg Nitrite curing salt
0.200 kg Phosphate (soluble)
0.100 kg Sugar
0.020 kg Sodium ascorbate
PROCESSING:
Beef silverside tip or brisket is trimmed and chilled (+4°C) prior to brine injection
Brine is prepared and chilled
20% curing brine are injected in the meat (based on fresh meat weight)
Injected Beef silverside tip or brisket are submerged in remaining brine
Keep in chiller for 36-48 hours
Beef silverside tip or brisket are hung and hot-smoked
After hot-smoking, cool down at ambient temperature and transfer to
chiller over night
Slice 2-4 mm and vacuum-pack
These are what you need in preparing your own beef bacon at home.
Raw materials:
20.000 kg Beef silverside tip or brisket (meat 60-80%)
Bones and soft bones are removed
10 mm layer of body fat is left on silverside tip
Brine composition:
8.800 kg Ice water
1.200 kg Nitrite curing salt
0.200 kg Phosphate (soluble)
0.100 kg Sugar
0.020 kg Sodium ascorbate
PROCESSING:
Beef silverside tip or brisket is trimmed and chilled (+4°C) prior to brine injection
Brine is prepared and chilled
20% curing brine are injected in the meat (based on fresh meat weight)
Injected Beef silverside tip or brisket are submerged in remaining brine
Keep in chiller for 36-48 hours
Beef silverside tip or brisket are hung and hot-smoked
After hot-smoking, cool down at ambient temperature and transfer to
chiller over night
Slice 2-4 mm and vacuum-pack

 1/2 cup mayonnaise
2 tablespoons ketchup
1 tablespoon white vinegar
2 teaspoons sugar
2 teaspoons sweet pickle relish
1 teaspoon finely minced white onion
1/8 teaspoon salt
dash of black pepper
1. Combine all of the ingredients in a small bowl. Stir well.
2. Place dressing in a covered container and refrigerate for several hours, stirring occasionally, so that the sugar dissolves and the flavors blend.
Makes about 3/4 cup.
1/2 cup mayonnaise
2 tablespoons ketchup
1 tablespoon white vinegar
2 teaspoons sugar
2 teaspoons sweet pickle relish
1 teaspoon finely minced white onion
1/8 teaspoon salt
dash of black pepper
1. Combine all of the ingredients in a small bowl. Stir well.
2. Place dressing in a covered container and refrigerate for several hours, stirring occasionally, so that the sugar dissolves and the flavors blend.
Makes about 3/4 cup.

 Photo by
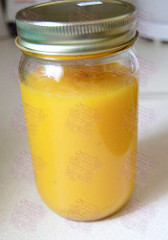 Photo by purplevintagespaceprincess[/caption]
 Photo by
 Source: (Wilfredo G. Yap, Antonio C. Villaluz, Ma. Gracia G. Soriano, and Mary Nia Santos) Milkfish Production and Processing Technologies in the Philippines

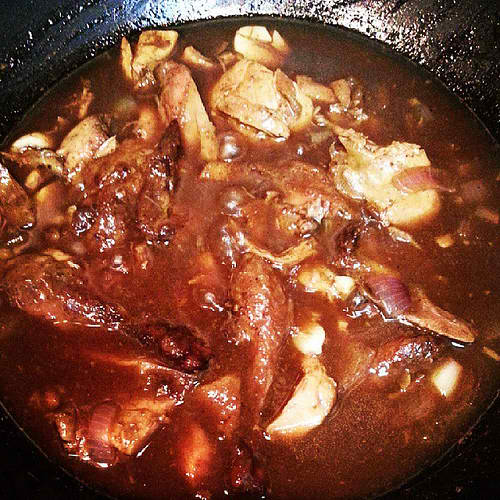 Lechon Paksiw
Ingredients
Lechon Paksiw
Ingredients

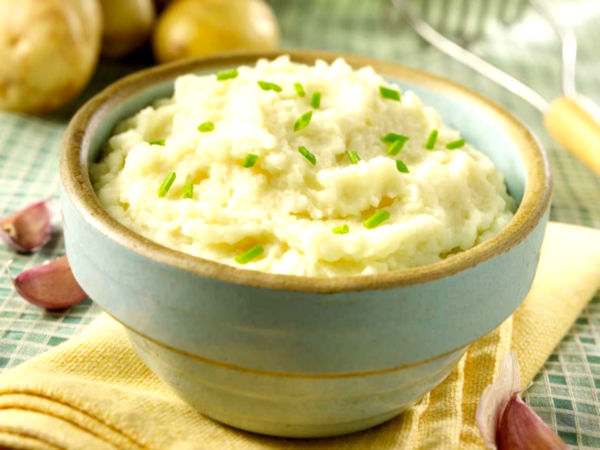 Chevys® Garlic Mashed Potatoes
This easy-to-clone dish comes with many of the tasty entrees at the restaurant chain or can be ordered up, pronto, on the side. It's a nice clone to have around since it goes well with so many dishes, Mexican or otherwise. Just give yourself the time to bake and cool the potatoes.
4 medium/large russet potatoes
1 tablespoon butter
1 tablespoon minced fresh garlic (3-4 cloves)
3/4 cup water
1/2 cup cream
3/4 teaspoon salt
1/8 teaspoon black pepper
1. Preheat oven to 400 degrees.
2. Bake the potatoes by first rubbing them lightly with oil and then baking them in the preheated oven for 1 hour until they are tender. Cool.
3. Mash potatoes and remove about half of the skin. You want to leave the rest in.
4. Melt the butter in a large suacepan over medium heat, then add garlic and saute for 5 minutes.
5. Add the remaining ingredients to the pan and cook for 5-10 minutes while stirring often until garlic mashed potatoes are very hot.
Serves 4.
Chevys® Garlic Mashed Potatoes
This easy-to-clone dish comes with many of the tasty entrees at the restaurant chain or can be ordered up, pronto, on the side. It's a nice clone to have around since it goes well with so many dishes, Mexican or otherwise. Just give yourself the time to bake and cool the potatoes.
4 medium/large russet potatoes
1 tablespoon butter
1 tablespoon minced fresh garlic (3-4 cloves)
3/4 cup water
1/2 cup cream
3/4 teaspoon salt
1/8 teaspoon black pepper
1. Preheat oven to 400 degrees.
2. Bake the potatoes by first rubbing them lightly with oil and then baking them in the preheated oven for 1 hour until they are tender. Cool.
3. Mash potatoes and remove about half of the skin. You want to leave the rest in.
4. Melt the butter in a large suacepan over medium heat, then add garlic and saute for 5 minutes.
5. Add the remaining ingredients to the pan and cook for 5-10 minutes while stirring often until garlic mashed potatoes are very hot.
Serves 4.

 Photo by
 French Vanilla Ice Cream
Ingredients:
1 recipe custard base
1 vanilla bean (split)
Procedure:
1)Follow the first step in the custard base recipe and combine the milk cream and sugar (do not start heating).
2)Next, you need to scrape out the seeds of the vanilla bean (they contain all that delicious and aromatic vanilla flavor). First, just split the vanilla bean in half, lengthwise. Then scrape the seeds out with a knife and combine them with the milk cream and sugar.
3)Now just follow the rest of the custard base recipe, and that’s it!
*Note, if you do not have any vanilla bean on hand, this recipe can also be made with vanilla extract. If you decide to use vanilla extract, just follow the recipe for custard base, and when you are finished, stir in one tablespoon of vanilla extract. Top it with fruit, nuts, chocolate, candy, etc.
Custard Ice Cream Base
The ice cream base is the essential part of what makes ice cream really creamy and luxurious.
Ingredients:
1 cup heavy whipping cream
1/2 cups of whole milk
1/3 cup sugar
1 tablespoon condensed milk
3 egg yolks
*optional: 1 teaspoon flour (helps to stabilize the ice cream)
*optional: 1 teaspoon hard liquor for flavor and stabilization
Cooking utensils:
a medium saucepan
two medium sized bowls
a strainer
measuring cups and spoons
1) Heat the milk, cream, condensed milk, and 1/3 cup sugar in a saucepan, until sugar is dissolved and milk is steaming.
2) Whisk the egg yolks in a separate bowl. Add one cup of the hot milk mixture to the egg yolks (making sure to poor slowly and stir / whisk). Then, pour the mixture back into the sauce pan while continually stirring the mixture. The stirring prevents the eggs from reaching a too high temperature and becoming scrambled eggs.
3) Cook the mixture over medium heat from two to seven minutes. You will know it is done when the mixture coats the back of a wooden spoon and leaves a clean streak when you drag your finger through it. You will also see steam rising from the mixture. Don't worry if you see that some of the mixture has thickened on the bottom of the pan, this will be strained out.
4) Chill the mixture and then add it to your ice cream maker.
Sources: entrepreneur.com.ph, make-ice-cream.com
French Vanilla Ice Cream
Ingredients:
1 recipe custard base
1 vanilla bean (split)
Procedure:
1)Follow the first step in the custard base recipe and combine the milk cream and sugar (do not start heating).
2)Next, you need to scrape out the seeds of the vanilla bean (they contain all that delicious and aromatic vanilla flavor). First, just split the vanilla bean in half, lengthwise. Then scrape the seeds out with a knife and combine them with the milk cream and sugar.
3)Now just follow the rest of the custard base recipe, and that’s it!
*Note, if you do not have any vanilla bean on hand, this recipe can also be made with vanilla extract. If you decide to use vanilla extract, just follow the recipe for custard base, and when you are finished, stir in one tablespoon of vanilla extract. Top it with fruit, nuts, chocolate, candy, etc.
Custard Ice Cream Base
The ice cream base is the essential part of what makes ice cream really creamy and luxurious.
Ingredients:
1 cup heavy whipping cream
1/2 cups of whole milk
1/3 cup sugar
1 tablespoon condensed milk
3 egg yolks
*optional: 1 teaspoon flour (helps to stabilize the ice cream)
*optional: 1 teaspoon hard liquor for flavor and stabilization
Cooking utensils:
a medium saucepan
two medium sized bowls
a strainer
measuring cups and spoons
1) Heat the milk, cream, condensed milk, and 1/3 cup sugar in a saucepan, until sugar is dissolved and milk is steaming.
2) Whisk the egg yolks in a separate bowl. Add one cup of the hot milk mixture to the egg yolks (making sure to poor slowly and stir / whisk). Then, pour the mixture back into the sauce pan while continually stirring the mixture. The stirring prevents the eggs from reaching a too high temperature and becoming scrambled eggs.
3) Cook the mixture over medium heat from two to seven minutes. You will know it is done when the mixture coats the back of a wooden spoon and leaves a clean streak when you drag your finger through it. You will also see steam rising from the mixture. Don't worry if you see that some of the mixture has thickened on the bottom of the pan, this will be strained out.
4) Chill the mixture and then add it to your ice cream maker.
Sources: entrepreneur.com.ph, make-ice-cream.com

 via: http://kusinaniina.blogspot.com[/caption]

 via: popapaya.blogspot.com[/caption]
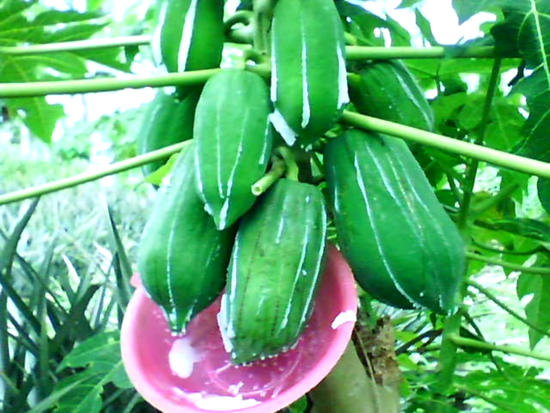
How To Make Papain
Papain is made from green papaya fruits while these are still attached to the tree. The bigger is the fruit, the more latex is derived. More amount of latex is gathered if this is done 3 times a week in a month. The more cuts are made, the less is the flow of latex. The best time for gathering latex is between 8:00 a.m. to 12:00 noon.
Procedure:
1. Cut the raw papaya (on the tree) with a sharp glass, about 2 mm. deep.
2. Collect the flowing latex in a plastic container and put in a glass bottle.
3. Dry the latex in the sun or oven.
4. Pulverize the dried latex.
Source: Selected R&D Completed Projects, NSDB 1980
via: popapaya.blogspot.com[/caption]
How To Make Papain
Papain is made from green papaya fruits while these are still attached to the tree. The bigger is the fruit, the more latex is derived. More amount of latex is gathered if this is done 3 times a week in a month. The more cuts are made, the less is the flow of latex. The best time for gathering latex is between 8:00 a.m. to 12:00 noon.
Procedure:
1. Cut the raw papaya (on the tree) with a sharp glass, about 2 mm. deep.
2. Collect the flowing latex in a plastic container and put in a glass bottle.
3. Dry the latex in the sun or oven.
4. Pulverize the dried latex.
Source: Selected R&D Completed Projects, NSDB 1980

 Ingredients:
600g ground chicken
1/4 cup minced onions
1/2 tsp. chopped dried rosemary
3 tbsp. minced garlic
1/4 cup minced carrots
1 egg
1/2 cup flour
1 1/2 tsp. salt
1/2 tsp. pepper
3/4 cup flour
2 tbsp. cornstarch
3 eggs, beaten
1/2 cup water
pinch salt
2/3 cup flour
1 cup breadcrumbs
oil for deep-frying
Procedure:
1. Pre-heat oven to 350oF. Line a 9x7 baking pan with foil or parchment paper.
2. In a bowl, mix chicken, onions, rosemary, garlic, carrots, egg, flour and seasonings. Blend well.
3. Press unto prepared pan and bake for 30 minutes. Let cool and slice into nugget-size serving pieces.
4. To make the batter: In a bowl, combine flour , cornstarch, egg, water and salt. Mix until well-blended and smooth.
5. Dredge nuggets in remaining flour and shake off the excess.
6. Dip each nugget onto prepared batter then dredge on the breadcrumbs.
7. Deep-fry in hot oil until golden brown in color. Drain in paper towels to remove excess fat before serving.
Ingredients:
600g ground chicken
1/4 cup minced onions
1/2 tsp. chopped dried rosemary
3 tbsp. minced garlic
1/4 cup minced carrots
1 egg
1/2 cup flour
1 1/2 tsp. salt
1/2 tsp. pepper
3/4 cup flour
2 tbsp. cornstarch
3 eggs, beaten
1/2 cup water
pinch salt
2/3 cup flour
1 cup breadcrumbs
oil for deep-frying
Procedure:
1. Pre-heat oven to 350oF. Line a 9x7 baking pan with foil or parchment paper.
2. In a bowl, mix chicken, onions, rosemary, garlic, carrots, egg, flour and seasonings. Blend well.
3. Press unto prepared pan and bake for 30 minutes. Let cool and slice into nugget-size serving pieces.
4. To make the batter: In a bowl, combine flour , cornstarch, egg, water and salt. Mix until well-blended and smooth.
5. Dredge nuggets in remaining flour and shake off the excess.
6. Dip each nugget onto prepared batter then dredge on the breadcrumbs.
7. Deep-fry in hot oil until golden brown in color. Drain in paper towels to remove excess fat before serving.

 Squash Cuchinta
Materials:
1 cup mashed boiled squash
3/4 cup brown sugar
3/4 cup all purpose flour, shifted
1 cup water
1 teaspoon lye (dissolved)
Procedure:
1. Dissolve the sugar in water and boil, allow to cool.
2 Add the flour little by little.
3 Add the squash, keep on stirring until it becomes fine in texture.
4. Shift
5 Add the lye, stir.
6. Put the mixture in molds, with allowance of a little space from the rim.
7. Cook in double boiler for 20 minutes.
Squash Maja
Materials:
1 cup cornstarch
3 cups coconut milk (second extraction)
1 cup coconut milk (first extraction)
1½ cups squash, boiled and mashed
1/4 teaspoon vanilla
Procedure:
1. Mix cornstarch and 1 cup coconut milk (second extraction).
2. Mix the 2 cups more.
3. Add coconut milk (first extraction), squash, sugar, and vanilla. Mix thoroughly and pass through a sieve
4. Cook over low fire, continually mixing until it becomes thick.
5. Put in molds, let cool.
6. Put "budbud" on top when served.
To prepare budbud: 1/3 cup sugar for every 1 cup coconut meal. Roast in carajay until golden brown.
Squash Jelly
Materials:
1 cup mashed boiled squash
1 cup mashed boiled gabi
½ cup white sugar
1/3 cup condensed milk
1/4 tsp vanilla
2 tbsp butter
1 tbsp butter for lining molds
Procedure:
1. Sieve the squash and gabi until a fine paste is attained.
2. Mix them together with sugar.
3. Cook in low fire, continually stirring to prevent scorching.
4. When thick, add condensed milk and vanilla, keep on stirring until the desired consistency is attained
5. Add the butter, keep on stirring until the surface is smooth and glossy.
6. Line the inside walls of the molds with butter, then
7. Put the mixture in the molds
Squash MacaroonsMaterials:
½ cup butter
4 eggs
1/3 cup white sugar
½ pack dessicated coconut
2 tsp vanilla
3/4 cup grated squash
Procedure:
1. Cream the butter until light and fluffy.
2. Add the sugar gradually while stirring.
3. Add eggs one by one constantly stirring after adding each eggs.
4. Add the condensed milk.
5. Add the dessicated coconut, squash, vanilla, and mix well.
6. Put in muffin molds lined with paper or aluminum foil.
7. Cook in oven at 350°C for half an hour.
KALCOSUMAN (Squash Suman)
Materials:
½ cup malagkit rice
2 cups grated squash
1½ cups ordinary rice
1/3 cup latik
3/4 cup coconut milk (second extraction)
1½ cups sugar
banana leaves
string
Procedure:
1. Soak overnight: rice and malagkit and grind on the following day.
2. Soak the ground rice and malagkit in coconut milk until soft.
3. Add the sugar and squash.
4. Cook over low fire, constantly stirring until thick. Cool
5. Prepare the leaves for wrapping by heating over low fire. Brush the leaves with butter
6. Put two tablespoonful of the mixture in every wrap, put latik on top of each before closing
7. Tie with string and cook for half an hour in a double boiler container.
Source: FNRI-DOST
Kalabasa Pan de Sal (Squash Pandesal)
Materials:
12% flour from squash
88% ordinary flour
yeast, salt (pinch), oil and sugar as in ordinary bread
Procedure:
1. Melt the yeast in warm water and leave it for 8-10 minutes.
2. Mix together: squash flour, ordinary flour and oil Beat with a Hobart mixer (Speed 2) for 6 minutes while adding sugar and salt. Leave it for one-half hour.
3. Knead the dough and roll to form pieces of pandesal.
4. Put in oven and cook like ordinary bread.
Source: NSDB Completed Researches
Squash Corn Chips
Materials:
Squash
Corn flour
Oil
Sugar or salt
Flavoring
Procedure:
1. Peel the squash, cut into fine pieces.
2. Steam and grind
3. Mix squash and corn flour in the following proportions:
7 parts squash (70%)
3 parts corn (30%)
4. Add flavoring and sugar (or salt).
5. Steam for 15 minutes.
6. Pass through a noodle machine at 1.2 cm. chips
7. Dry the resulting chips on a forced draft at 65°C-70°C for 2½ hours. This will last for six weeks if packed in plastic bags and ten weeks if packed in laminated packs.
Source: R&D Completed Projects DOST
Squash Cuchinta
Materials:
1 cup mashed boiled squash
3/4 cup brown sugar
3/4 cup all purpose flour, shifted
1 cup water
1 teaspoon lye (dissolved)
Procedure:
1. Dissolve the sugar in water and boil, allow to cool.
2 Add the flour little by little.
3 Add the squash, keep on stirring until it becomes fine in texture.
4. Shift
5 Add the lye, stir.
6. Put the mixture in molds, with allowance of a little space from the rim.
7. Cook in double boiler for 20 minutes.
Squash Maja
Materials:
1 cup cornstarch
3 cups coconut milk (second extraction)
1 cup coconut milk (first extraction)
1½ cups squash, boiled and mashed
1/4 teaspoon vanilla
Procedure:
1. Mix cornstarch and 1 cup coconut milk (second extraction).
2. Mix the 2 cups more.
3. Add coconut milk (first extraction), squash, sugar, and vanilla. Mix thoroughly and pass through a sieve
4. Cook over low fire, continually mixing until it becomes thick.
5. Put in molds, let cool.
6. Put "budbud" on top when served.
To prepare budbud: 1/3 cup sugar for every 1 cup coconut meal. Roast in carajay until golden brown.
Squash Jelly
Materials:
1 cup mashed boiled squash
1 cup mashed boiled gabi
½ cup white sugar
1/3 cup condensed milk
1/4 tsp vanilla
2 tbsp butter
1 tbsp butter for lining molds
Procedure:
1. Sieve the squash and gabi until a fine paste is attained.
2. Mix them together with sugar.
3. Cook in low fire, continually stirring to prevent scorching.
4. When thick, add condensed milk and vanilla, keep on stirring until the desired consistency is attained
5. Add the butter, keep on stirring until the surface is smooth and glossy.
6. Line the inside walls of the molds with butter, then
7. Put the mixture in the molds
Squash MacaroonsMaterials:
½ cup butter
4 eggs
1/3 cup white sugar
½ pack dessicated coconut
2 tsp vanilla
3/4 cup grated squash
Procedure:
1. Cream the butter until light and fluffy.
2. Add the sugar gradually while stirring.
3. Add eggs one by one constantly stirring after adding each eggs.
4. Add the condensed milk.
5. Add the dessicated coconut, squash, vanilla, and mix well.
6. Put in muffin molds lined with paper or aluminum foil.
7. Cook in oven at 350°C for half an hour.
KALCOSUMAN (Squash Suman)
Materials:
½ cup malagkit rice
2 cups grated squash
1½ cups ordinary rice
1/3 cup latik
3/4 cup coconut milk (second extraction)
1½ cups sugar
banana leaves
string
Procedure:
1. Soak overnight: rice and malagkit and grind on the following day.
2. Soak the ground rice and malagkit in coconut milk until soft.
3. Add the sugar and squash.
4. Cook over low fire, constantly stirring until thick. Cool
5. Prepare the leaves for wrapping by heating over low fire. Brush the leaves with butter
6. Put two tablespoonful of the mixture in every wrap, put latik on top of each before closing
7. Tie with string and cook for half an hour in a double boiler container.
Source: FNRI-DOST
Kalabasa Pan de Sal (Squash Pandesal)
Materials:
12% flour from squash
88% ordinary flour
yeast, salt (pinch), oil and sugar as in ordinary bread
Procedure:
1. Melt the yeast in warm water and leave it for 8-10 minutes.
2. Mix together: squash flour, ordinary flour and oil Beat with a Hobart mixer (Speed 2) for 6 minutes while adding sugar and salt. Leave it for one-half hour.
3. Knead the dough and roll to form pieces of pandesal.
4. Put in oven and cook like ordinary bread.
Source: NSDB Completed Researches
Squash Corn Chips
Materials:
Squash
Corn flour
Oil
Sugar or salt
Flavoring
Procedure:
1. Peel the squash, cut into fine pieces.
2. Steam and grind
3. Mix squash and corn flour in the following proportions:
7 parts squash (70%)
3 parts corn (30%)
4. Add flavoring and sugar (or salt).
5. Steam for 15 minutes.
6. Pass through a noodle machine at 1.2 cm. chips
7. Dry the resulting chips on a forced draft at 65°C-70°C for 2½ hours. This will last for six weeks if packed in plastic bags and ten weeks if packed in laminated packs.
Source: R&D Completed Projects DOST

 Burong isda is a product from salted fish with fermented rice.
Materials:
1 kilo fish (dalag or hito)
2/3 cup salt
3 1/3 cup rice
6 2/3 cup water angkak
Equipment:
Fermenting vessels
Procedure:
Preparation of the fish
1. Remove scales from the fish
2. Slice from head to tail, clean, wash and drain excess water completely
3. Salt and cover the fish to prevent flies from laying eggs. Allow to stand for two hours
Preparation of rice
1. Cook the rice and cool, then blend with angkak to develop a characteristic flavor and to impart an appetite stimulating color.
2. Pack salted fish in a mixture of salt, rice and angkak into a jar.
3. Cover the jar with plastic bag to exclude air. Ferment for 7-10 days. Fermentation gives a pinkish color to the mixture.
Cooking
1. Saute the fermented mixture with garlic and onions.
2. Fish flesh is soft and the originally hard bones becomes tender like a cartilage after it is cooked.
Source: Industrial Technology Development Institute (DOST)
Burong isda is a product from salted fish with fermented rice.
Materials:
1 kilo fish (dalag or hito)
2/3 cup salt
3 1/3 cup rice
6 2/3 cup water angkak
Equipment:
Fermenting vessels
Procedure:
Preparation of the fish
1. Remove scales from the fish
2. Slice from head to tail, clean, wash and drain excess water completely
3. Salt and cover the fish to prevent flies from laying eggs. Allow to stand for two hours
Preparation of rice
1. Cook the rice and cool, then blend with angkak to develop a characteristic flavor and to impart an appetite stimulating color.
2. Pack salted fish in a mixture of salt, rice and angkak into a jar.
3. Cover the jar with plastic bag to exclude air. Ferment for 7-10 days. Fermentation gives a pinkish color to the mixture.
Cooking
1. Saute the fermented mixture with garlic and onions.
2. Fish flesh is soft and the originally hard bones becomes tender like a cartilage after it is cooked.
Source: Industrial Technology Development Institute (DOST)

 If you want to eat chicken inasal but far from Bacolod city, you can still enjoy eating this delicious dish by making your own homemade chicken inasal.
Chicken Inasal -1
Ingredients:
1 whole chicken, cut into 6 parts (legs, wings, breasts)
Marinade:
1 head garlic, macerated
2 tbsps. chopped ginger
1 tbsp. brown sugar
1/3 cup sinamak, (native coconut vinegar)
10 pieces calamansi, extract the juice
3 stalks tanglad (lemon grass), julienne
salt and coarsely ground pepper
Basting Sauce:
1/2 cup Star Margarine
1/4 cup atsuete (annatto seeds) oil
salt and pepper
large bamboo skewers
charcoal for grilling
Procedure:
In a large bowl, place the garlic, ginger, vinegar, a small amount of sugar, tanglad, calamansi juice, salt, and pepper. Mix all the ingredients then add the chicken meat. Lightly rub the marinade on the meat. Place chicken in the chiller and let sit. After 30 minutes, turn the meat and let it sit for another 30 minutes. It is not ideal to marinate the meat overnight since the acid of the vinegar will completely break down the enzymes of the meat.
Meanwhile in a saucepan, over low fire, put margarine and annatto seeds. For few minutes, continue stirring until the margarine melts and the annatto seeds are well infused and have developed a deep orange color. Turn off heat then add a small amount of salt and pepper to taste.
After marinating the chicken, put several slits on the part near the bone to help with cooking the meat fully. Skewer the meat and cook over hot charcoal grill, skin side down, basting it once in a while. As much as possible do not turn the meat more than twice since the result will be drier meat.
Serve while hot together with steamed rice paired with grilled oysters and sinamak or soy sauce with calamansi and siling labuyo (red chili peppers).
Chicken Inasal -2
Ingredients:
2/3 cup local white vinegar
1/2 cup soda (7-up or sprite)
1 1/2 tbsps. chopped ginger
2 tbsps. calamansi juice
2 tbsps. brown sugar
1 tbsp. onion powder
1/2 tbsp. rock salt
1 tsp. pepper
1 whole chicken, cut in half
For the annato oil:
3 tbsps. corn oil
1/3 cup annato seeds
1 tsp. salt
1 tbsp. butter
2 tbsps. local wine vinegar
Procedure:
1. In a bowl, mix vinegar, soda, ginger, calamansi juice, brown sugar, onion powder, salt, and pepper.
2. Add the chicken pieces. Rub marinade into into chicken; let stand for 1 hour at room temperature before refrigerating. Chill overnight.
3. Make the annato oil: Warm oil in a saucepan and add annato seeds. Stir until the seeds release their color and aroma. Pass through a strainer to remove seeds. Return to heat. Add salt, butter, and vinegar; simmer for 2 minutes.
4. When ready, grill and baste marinated chicken with annato oil for at least 20 minutes.
Sources: wikipilipinas.org, yummy magazine
Photo:
If you want to eat chicken inasal but far from Bacolod city, you can still enjoy eating this delicious dish by making your own homemade chicken inasal.
Chicken Inasal -1
Ingredients:
1 whole chicken, cut into 6 parts (legs, wings, breasts)
Marinade:
1 head garlic, macerated
2 tbsps. chopped ginger
1 tbsp. brown sugar
1/3 cup sinamak, (native coconut vinegar)
10 pieces calamansi, extract the juice
3 stalks tanglad (lemon grass), julienne
salt and coarsely ground pepper
Basting Sauce:
1/2 cup Star Margarine
1/4 cup atsuete (annatto seeds) oil
salt and pepper
large bamboo skewers
charcoal for grilling
Procedure:
In a large bowl, place the garlic, ginger, vinegar, a small amount of sugar, tanglad, calamansi juice, salt, and pepper. Mix all the ingredients then add the chicken meat. Lightly rub the marinade on the meat. Place chicken in the chiller and let sit. After 30 minutes, turn the meat and let it sit for another 30 minutes. It is not ideal to marinate the meat overnight since the acid of the vinegar will completely break down the enzymes of the meat.
Meanwhile in a saucepan, over low fire, put margarine and annatto seeds. For few minutes, continue stirring until the margarine melts and the annatto seeds are well infused and have developed a deep orange color. Turn off heat then add a small amount of salt and pepper to taste.
After marinating the chicken, put several slits on the part near the bone to help with cooking the meat fully. Skewer the meat and cook over hot charcoal grill, skin side down, basting it once in a while. As much as possible do not turn the meat more than twice since the result will be drier meat.
Serve while hot together with steamed rice paired with grilled oysters and sinamak or soy sauce with calamansi and siling labuyo (red chili peppers).
Chicken Inasal -2
Ingredients:
2/3 cup local white vinegar
1/2 cup soda (7-up or sprite)
1 1/2 tbsps. chopped ginger
2 tbsps. calamansi juice
2 tbsps. brown sugar
1 tbsp. onion powder
1/2 tbsp. rock salt
1 tsp. pepper
1 whole chicken, cut in half
For the annato oil:
3 tbsps. corn oil
1/3 cup annato seeds
1 tsp. salt
1 tbsp. butter
2 tbsps. local wine vinegar
Procedure:
1. In a bowl, mix vinegar, soda, ginger, calamansi juice, brown sugar, onion powder, salt, and pepper.
2. Add the chicken pieces. Rub marinade into into chicken; let stand for 1 hour at room temperature before refrigerating. Chill overnight.
3. Make the annato oil: Warm oil in a saucepan and add annato seeds. Stir until the seeds release their color and aroma. Pass through a strainer to remove seeds. Return to heat. Add salt, butter, and vinegar; simmer for 2 minutes.
4. When ready, grill and baste marinated chicken with annato oil for at least 20 minutes.
Sources: wikipilipinas.org, yummy magazine
Photo: 
 Photo by