Here’s a recipe on how to make Alfredo sauce. Fettuccine Alfredo is a dish of fettuccine pasta with a sauce made of cream, butter and cheese. In popular American cooking the cream preparation is considered to be a sauce, though this is not the Italian convention. This recipe will sauce one pound of pasta and …
↧
How to Make Alfredo Sauce
↧
How to Make Cough Candy Using Herbal Plant Extracts
Researchers of ITDI have formulated a cough candy using oils of ginger (Zinigiber officinale Rosc ) and “kalamansi” (Citrus microcarpa Bunge) and extracts from tamarind (Tamarindus indica Linn.) and “kalamansi”. The use of local plant products to substitute for the imported raw materials/ingredients in the manufacture of pharmaceuticals may help contribute to the reduction of …
↧
↧
How to Make Lechon Paksiw
Lechon Paksiw – Roast pork in sweet and sour sauce If you have ever hosted a true Filipino party whether it be a birthday, wedding or a community fiesta (feast) then you would know that a party is never complete without Roast Pig or Roast Suckling Pig. Oftentimes in these occasions there will be many …
↧
Tilapia Longganisa (Value-Added Products from Tilapia)
Tilapia Longganisa (Value-Added Products from Tilapia). To boost the income from tilapia production, tilapia farmers may indulge in the processing of fresh tilapia into Tilapia Longganisa which may be sold at a higher price. Tilapia Longganisa Recipe Raw Materials: 10 kg. Fresh Tilapia Pig Casing Ingredients: 1 cup Soy sauce ½ cup Vinegar 2 tbsp. …
↧
How to Make No Bake Yema Cake
Here are some Yema cake recipes that you can do at home easily. Yema is used as a glaze in this mouth-watering yema cake recipe. No Bake Yema Cake by Kusina Chef Cake ingredients: 2 cups all purpose flour 2 cups sugar 1 cup milk(evap) 1/2 tsp baking powder 1 tsp baking soda 2 tbsp …
↧
↧
How to Make Yema Spread- Yema Dulce De Leche
This homemade yema spread is a perfect partner for your bread and pastries or with fruits. This also makes a good business idea to start for anyone looking for an extra income. Try this yema spread recipes. Yema Spread By Kusina Chef Ingredients: 306 ml Condensed milk 5 egg yolks 155 ml evaporated milk 1/8 …
↧
Promising Products from Goat’s Milk
Goat raising is profitable because there are a lot of products one can make out of goat’s milk like cheese, pastillas, yogurt and of course soap! Yogurt and pastillas are valuable products of goat’s milk more so the goat’s milk soap because it is in demand as spas and beauty shops. Goat Milk Yogurt e-How …
↧
How to Make Fish Longganisa


Fish Longganisa Ingredients:
1 kg minced fish meat (Milkfish, tilapia etc.) 1 tsp all spice powder 1 tbsp ground pepper Pig casing 1/4 cup atsuete 1 tsp MSG (optional) 1/2 cup garlic Cooking oilProcedure:1. Cut the fish fillet into cubes and pass through the grinder. 2. Mixed all ingredients and blend well. 3. Stuff manually in a pig casing. 4. Tie it with a cotton thread in equal distance of about 2 inches. 5. Pack in polyethylene bag. 6. Store in freezer for longer storage.↧
How to Make and Use Herb Preparations

 Photo by Amanda Kae's Photoz
  [/caption]But even the best plants can be ruined if you use the wrong kind of process in preparing your remedies. Your choice depends on the parts of the plant to be used, the form in which the remedy will be taken, and the desired result.Remember that herbal remedies are not one-shot wonder cures. Their effectiveness is based largely on a gradual cure.The following ways of preparing your fresh herbs are those most commonly used in herbal medicine. Always use an enamel or non-metallic pot.Infusion - this is a beverage made like tea, combining boiled water with the plants and steeping it to extract the active ingredients. The normal amounts are about 1/2 to 1 ounce of the plant to one pint of boiled water. You should let the mixture steep for five to ten minutes, covered, and strain the infusion into a cup.Cold Extract - preparing herbs with cold water preserves the most volatile ingredients, while extracting only minor amounts of mineral salts and bitter principles. Add about double the amount of plant material used for an infusion to cold water and let sit for about 8 to 12 hours, strain and drink.Decoction - this method or preparation allows you to extract primarily the mineral salts and bitter principles rather than vitamins and volatile ingredients. Boil about half an ounces of plant parts per cup of water for up to 4 minutes. Steep the mixture with the cover on the pot for a few minutes.Juice - chop and press fresh plant parts to make juice, then add a bit of water and press again. This is excellent for getting vitamins and minerals from the plant. Drink the juice right away for the best results.Syrup - make a basic syrup to which you will add medicinal ingredients by boiling 3 pounds of raw, brown sugar in a pint of water until it reaches the right consistency.Powder - grind your dried plant parts until you have a powder. The powder can be taken with water, milk, soup, or swallowed in gelatin capsules.Ointment - quick method: combine well one part of your powdered remedy with four parts hot petroleum jelly or lard. For purists: Add the decoction of the desired herb to olive oil and simmer until the water has completely evaporated. Add beeswax as needed to get a firm consistency. A little gum benzoin or a drop of tincture of benzoin per ounce of fat will help preserve the ointment.Essence - dissolve 1 ounce of the herb's essential oil in a pint of alcohol; this method preserves the volatile oils of many plants which are not water-soluble.Poultice - to make a poultice, you just crush the medicinal parts of the plant to a pulpy mass and heat. Mix with a hot, sticky substance such as moist flour or corn meal. Apply the pasty mixture directly to the skin. Wrap a hot towel around and moisten the towel periodically. A poultice will draw impurities from the body.Herb Bath - herbal baths include the use of various herbal additives to enhance the natural healing power of the water. They are baths to which plant decoctions or infusions have been added. There are full and partial herbal baths. For a full bath some of the medicinal plant parts should be sewn into a cloth bag and then boiled in a quart of water; the strained mixture is then added to the bath. Sometimes you can put the bag right into the tub for a more thorough extraction of the herbal properties.
↧
↧
Processing Cassava into Flour for Human Food

 Photo by CIAT International Center for Tropical Agriculture [/caption]However, the price of cassava products is unstable, depending on the market demand each year. One way of solving this problem is to add value to the cassava through diversified usage, especially industrial utilization and human consumption. Processing cassava flour for human food is one solution to the problem of unstable prices for cassava products.
Adaptability of the Technology
Thailand imports wheat flour for baked goods and other food products to a value of about US$120 million each year. The use of a locally produced cassava flour to replace wheat flour as a source of carbohydrate would reduce the cost of production and save on foreign exchange ( Fig. 4(446)). The production of cassava flour is a simple technology that farmers can do for themselves. In this way, farmers can increase their incomes.How to Make the Flour
To produce cassava flour, first wash the fresh roots then peel them. Wash the peeled roots. The roots are then chopped into small pieces about 5 x 0.5 x 0.2 cm, and sun-dried for two or three days (or dried in a hot air oven at 55oC). After drying, the moisture content of the cassava chips should be less than 8%.The chips are then milled, and the flour sieved through an 80 mesh sieve. Finally, the flour is packaged in plastic bags. Packaged in this way, the flour can be stored for at least eight months. The yield recovery of flour is about 20 - 40%, depending on the cultivar, the time of harvest and the equipment used.Avoiding Toxicity Problems
Good-quality cassava flour should be white and have a good smell. It should not be contaminated by insects or undesirable microorganisms. If drying takes place outdoors, this should be done on sunny days, otherwise the chips may smell bad and turn brown.It is best to use cassava cultivars which contain a low level of cyanogenic compounds, since these are potentially toxic. However, the cyanogenic content of fresh roots is not a serious problem in cassava flour production, since it is almost entirely eliminated during flour processing. Furthermore, Thailand's traditional cassava cultivars do not contain a high level of hydrocyanic acid. Our experiments on dried chips of cassava from nine cultivars found that the hydrocyanic content fell from 13.5-114.7 ppm in the fresh roots to 0.40- 2.37 ppm in the flour. The level varied according to the cultivar and the time of harvest.Cassava Flour As a Substitute for Wheat Flour
Cassava flour does not contain any gluten. If it is used to replace wheat flour 100%, the quality of the product will be different. A suitable ratio for replacing wheat flour that consumers find acceptable depends on the kind of food.For example, cassava flour can replace 75% of wheat flour in sponge cakes and chiffon cakes, 50% in butter cakes and cookies, 25% in doughnuts and spaghetti, and 20% in bread ( Fig. 5(436) and Fig. 6(466)). Cassava flour can be used to replace 25 - 50% of the rice starch in noodles, and will make the noodles softer and more elastic ( Fig. 7(462)).Index of Images

Figure 1 Cassava Plants

Figure 2 Cassava Roots

Figure 3 Dried Cassava Chips

Figure 4 Cassava Flour

Figure 5 Bakery Products with Cassava Flour

Figure 6 Cookies Made with Different Percentages of Cassava Flour

Figure 7 Noodles Made with Cassava Flour
Jinnajar Hansethsuk Rayong Field Crops Research Center Dept. of Agriculture, Thailand Tel.: 663-868-1514 Fax: 663-868-1515 E-mail: jinnajar@yahoo.com, 2003-11-01Source: agnet.org↧
How to Make English Muffins

 English MuffinsIngredients1 cup warm (105°-115°F) milk
2 tablespoons sugar
1 teaspoon salt
3 tablespoons margarine
1 cup warm (105°-115°F) water
1 package active dry yeast
5 to 6 cups all-purpose flour
cornmealProcedure
English MuffinsIngredients1 cup warm (105°-115°F) milk
2 tablespoons sugar
1 teaspoon salt
3 tablespoons margarine
1 cup warm (105°-115°F) water
1 package active dry yeast
5 to 6 cups all-purpose flour
cornmealProcedure- Combine milk, sugar, salt and margarine.
- Measure water into large warm bowl, sprinkle in yeast, and stir until dissolved.
- Stir in milk mixture and 3 cups flour; beat until smooth.
- Add enough additional four to make a stiff dough.
- Turn out onto floured board and knead about 2 minutes, or until dough is manageable and can be formed into a ball. The dough may be slightly sticky.
- Place in greased bowl, turning to grease top.
- Cover; let rise in a warm place, free from draft, until doubled in bulk, about an hour.
- Punch dough down; divide in half.
- On a board, heavily sprinkled with cornmeal, pat each half into a ½-inch thickness.
- Cut into circles with a floured 3-inch cookie cutter.
- Place on ungreased baking sheets about 2 inches apart.
- Cover and let rise in a warm place, free from drafts, until doubled in size, about ½ hour.
- Place on lightly greased medium hot griddle or skillet, cornmeal side down.
- Bake until well browned, about 10 minutes on each side.
- Cool on wire racks.
Retrieved from "http://en.wikibooks.org/w/index.php?title=Cookbook:English_Muffins&oldid=1746425" Wikipedia.org
↧
How to Make Deep Dish Pizza

 This recipe has many variants, which are found at the end of the recipe.Deep Dish Pizza CrustIngredients1 tsp active dry Yeast (fast rising yeast is acceptable)
3/4 cup warm water (about 90 degrees F)
1 cup flour
2 tbsp olive oil
1 tbsp sugar
1/2 tsp salt
3 cups additional flour
~1 cup warm water
4 tbsp cornmeal (optional)PreparationIn a mixing bowl or dough mixer, mix the yeast and 3/4 cup warm water. Let this stand for a few minutes to activate the yeast.Add and mix the 1 cup flour, oil, sugar, salt into a smooth batter. Add the remaining flour and water. Mix this until the dough has a slightly sticky consistency. Add additional water or flour to adjust the consistency. Mix and knead the dough until the dough springs slightly when touched.Let this rise in a warm location in a greased bowl until double. Punch down the dough in the bowl. Pour it onto a floured flat surface. Roll or shape the dough to the shape of a pizza pan and make an edge up the side of the pan for the crust. Roll the dough thicker for Deep Dish Pizza and thinner for a crisper and more traditional pizza crust.Preheat the oven to 425 degrees F., add the toppings and bake as noted below.Toppings
Ingredients1 or more 6-8 oz. can(s) of prepared pizza sauce, or make your own pizza sauce
1 lb shredded Mozzarella cheese
1/4 cup grated Romano cheese (optional)
1/4 cup grated Parmesan cheese (optional)ProcedureSpread the pizza sauce on the dough which was previously prepared, leaving the edge crust uncoated. Add any optional ingredients (pepperoni, sausage, green pepper, etc.). Spread the grated mozzarella cheese evenly across the pizza, leaving the edge crust untouched. If desired, sprinkle the grated Parmesan and Romano cheeses evenly over the toppings.Bake the pizza in the preheated 425 degree F. oven for 25-30 minutes or until the crust and cheese are lightly brown. If the pizza is browning on the crust and not in the middle, line the edge crust with aluminum foil to prevent burning. This rarely happens except on larger diameter pizzas of 16" or more.When removing from the oven, cut into about 8 triangular, pie shaped slices for serving. A pizza cutter with a circular wheel does this nicely.
Notes, Tips and VariationsThere are a variety of options in the crust, baking and especially in the toppings. The baking of the deep dish pizza described above is a cheese pizza in a round pan baked on an oven rack.Baking Options* Use a heated baking stone. This is a flat stone which sit in the oven and preheats to the oven temperature. It accelerates the baking and makes the crust more consistently brown. Decrease the baking time by removing the pizza when the crust and cheese center is light brown.
* A black pan will cook the crust faster and crisper.
* Use a professional pizza oven or wood fired stone hearth. This is generally a professional pizza kitchen option.Crust Options* Cornmeal is specified to flour the pan. It provides a unique characteristic to the crust and dries it a bit. It may omitted, or substituted with flour.
* The olive oil may be substituted by vegetable oil or butter for a different crust characteristic or for oiling the pan. Olive oil makes an Italian bread type of raised crust.
* If the crust is left to rise 15-30 minutes before it is baked, it will be thicker and more like an Italian bread crust
* If a mozzarella cheese stick or rolled slice of cheese is rolled and sealed into the outer crust with a pinch of the dough, it adds a unique filling of melted cheese to the otherwise bready crust. Some commercial pizza restaurants offer cheese filled crust.
* Brush some melted butter on the crust after it has baked.
* Pinch, slice or form the outer crust into a design before baking, just for the visual appearance.Pizza Pan Options* A round aluminum or steel deep dish pizza pan is generally used. It is 12-16 inches in diameter and 1-3 inched deep. Optionally the side removes to facilitate the cutting and serving. See this link for an example.
* Any flat pan may be substituted by rolling up the crust to form the edges. The edge crust tends to be like an Italian bread and less thick however. A rectangular pan tends to bake uneven.
* A special wheeled pizza cutter or deep dish pizza pan grip may facilitate handling and servingDeep Dish Pizza Optional ToppingsConsider adding or mixing the following. Many institutions in Chicago will add everything on their toppings option list and call it garbage pizza.1 lb pepperoni, sliced as thick or thin as one likes
1 lb bulk (or casing removed) Italian sausage (browned and crumbled)
1 green pepper, cleaned and sliced
1 medium or large onion, sliced or diced
1 lb ground beef (skillet browned and crumbled)
1/4 cup mushrooms (fresh sliced or canned sliced)
1 lb cooked bacon
1 lb ham, prepared any way
1 lb salami, sliced as thick or thin as one likes
1/2 cup pineapple, diced or in rings
1/2 cup cooked chicken pieces
1/4 cup anchovies
1/4 cup black olives, pitted and sliced
any other ingredientThe Order of the ToppingsThe order of the toppings on the pizza is an option as well. The photo above shows pepperoni placed on top of the cheese instead of under it.By changing the order of placement of the toppings, the same ingredients make a pizza that looks and even tastes different. Of course, the crust always is at the bottom for a base. For instance, these variants will make different pizza styles.Chicago Style Type Deep Dish (standard recipe noted above) Crust on bottom
Add the mozzarella cheese
Add the toppings (pepperoni, sausage, etc.)
Add the sauce
Add the grated cheeses
Serve with shakers of red pepper flakes and extra grated cheeseBoutique Deep Dish (some "upper crust" restaurants do this) Crust on bottom
Add the toppings (pepperoni, sausage, etc.)
Add the mozzarella cheese
Add the sauce over the cheese (may require more sauce to cover the ingredients)
Add the grated cheesesDeep Dish Old World Style (similar to photo) Crust on bottom
Add the sauce
Add most of the toppings (sausage, green pepper, etc.)
Add the mozzarella cheese
Add the grated cheeses
Add pepperoni or other decorative toppingEnjoy and feast on your experiments.Warnings* Pizza from the oven is hot. Warn the diners when served.
* Any meats added to the toppings must be cooked before baking. Raw meat or fish will not adequately cook in the pizza.Retrieved from "https://en.wikibooks.org/w/index.php?title=Cookbook:Deep_Dish_Pizza&oldid=2681759""Pepperoni pizza". Licensed under Public Domain via Wikimedia Commons - https://commons.wikimedia.org/wiki/File:Pepperoni_pizza.jpg#/media/File:Pepperoni_pizza.jpg
This recipe has many variants, which are found at the end of the recipe.Deep Dish Pizza CrustIngredients1 tsp active dry Yeast (fast rising yeast is acceptable)
3/4 cup warm water (about 90 degrees F)
1 cup flour
2 tbsp olive oil
1 tbsp sugar
1/2 tsp salt
3 cups additional flour
~1 cup warm water
4 tbsp cornmeal (optional)PreparationIn a mixing bowl or dough mixer, mix the yeast and 3/4 cup warm water. Let this stand for a few minutes to activate the yeast.Add and mix the 1 cup flour, oil, sugar, salt into a smooth batter. Add the remaining flour and water. Mix this until the dough has a slightly sticky consistency. Add additional water or flour to adjust the consistency. Mix and knead the dough until the dough springs slightly when touched.Let this rise in a warm location in a greased bowl until double. Punch down the dough in the bowl. Pour it onto a floured flat surface. Roll or shape the dough to the shape of a pizza pan and make an edge up the side of the pan for the crust. Roll the dough thicker for Deep Dish Pizza and thinner for a crisper and more traditional pizza crust.Preheat the oven to 425 degrees F., add the toppings and bake as noted below.Toppings
Ingredients1 or more 6-8 oz. can(s) of prepared pizza sauce, or make your own pizza sauce
1 lb shredded Mozzarella cheese
1/4 cup grated Romano cheese (optional)
1/4 cup grated Parmesan cheese (optional)ProcedureSpread the pizza sauce on the dough which was previously prepared, leaving the edge crust uncoated. Add any optional ingredients (pepperoni, sausage, green pepper, etc.). Spread the grated mozzarella cheese evenly across the pizza, leaving the edge crust untouched. If desired, sprinkle the grated Parmesan and Romano cheeses evenly over the toppings.Bake the pizza in the preheated 425 degree F. oven for 25-30 minutes or until the crust and cheese are lightly brown. If the pizza is browning on the crust and not in the middle, line the edge crust with aluminum foil to prevent burning. This rarely happens except on larger diameter pizzas of 16" or more.When removing from the oven, cut into about 8 triangular, pie shaped slices for serving. A pizza cutter with a circular wheel does this nicely.
Notes, Tips and VariationsThere are a variety of options in the crust, baking and especially in the toppings. The baking of the deep dish pizza described above is a cheese pizza in a round pan baked on an oven rack.Baking Options* Use a heated baking stone. This is a flat stone which sit in the oven and preheats to the oven temperature. It accelerates the baking and makes the crust more consistently brown. Decrease the baking time by removing the pizza when the crust and cheese center is light brown.
* A black pan will cook the crust faster and crisper.
* Use a professional pizza oven or wood fired stone hearth. This is generally a professional pizza kitchen option.Crust Options* Cornmeal is specified to flour the pan. It provides a unique characteristic to the crust and dries it a bit. It may omitted, or substituted with flour.
* The olive oil may be substituted by vegetable oil or butter for a different crust characteristic or for oiling the pan. Olive oil makes an Italian bread type of raised crust.
* If the crust is left to rise 15-30 minutes before it is baked, it will be thicker and more like an Italian bread crust
* If a mozzarella cheese stick or rolled slice of cheese is rolled and sealed into the outer crust with a pinch of the dough, it adds a unique filling of melted cheese to the otherwise bready crust. Some commercial pizza restaurants offer cheese filled crust.
* Brush some melted butter on the crust after it has baked.
* Pinch, slice or form the outer crust into a design before baking, just for the visual appearance.Pizza Pan Options* A round aluminum or steel deep dish pizza pan is generally used. It is 12-16 inches in diameter and 1-3 inched deep. Optionally the side removes to facilitate the cutting and serving. See this link for an example.
* Any flat pan may be substituted by rolling up the crust to form the edges. The edge crust tends to be like an Italian bread and less thick however. A rectangular pan tends to bake uneven.
* A special wheeled pizza cutter or deep dish pizza pan grip may facilitate handling and servingDeep Dish Pizza Optional ToppingsConsider adding or mixing the following. Many institutions in Chicago will add everything on their toppings option list and call it garbage pizza.1 lb pepperoni, sliced as thick or thin as one likes
1 lb bulk (or casing removed) Italian sausage (browned and crumbled)
1 green pepper, cleaned and sliced
1 medium or large onion, sliced or diced
1 lb ground beef (skillet browned and crumbled)
1/4 cup mushrooms (fresh sliced or canned sliced)
1 lb cooked bacon
1 lb ham, prepared any way
1 lb salami, sliced as thick or thin as one likes
1/2 cup pineapple, diced or in rings
1/2 cup cooked chicken pieces
1/4 cup anchovies
1/4 cup black olives, pitted and sliced
any other ingredientThe Order of the ToppingsThe order of the toppings on the pizza is an option as well. The photo above shows pepperoni placed on top of the cheese instead of under it.By changing the order of placement of the toppings, the same ingredients make a pizza that looks and even tastes different. Of course, the crust always is at the bottom for a base. For instance, these variants will make different pizza styles.Chicago Style Type Deep Dish (standard recipe noted above) Crust on bottom
Add the mozzarella cheese
Add the toppings (pepperoni, sausage, etc.)
Add the sauce
Add the grated cheeses
Serve with shakers of red pepper flakes and extra grated cheeseBoutique Deep Dish (some "upper crust" restaurants do this) Crust on bottom
Add the toppings (pepperoni, sausage, etc.)
Add the mozzarella cheese
Add the sauce over the cheese (may require more sauce to cover the ingredients)
Add the grated cheesesDeep Dish Old World Style (similar to photo) Crust on bottom
Add the sauce
Add most of the toppings (sausage, green pepper, etc.)
Add the mozzarella cheese
Add the grated cheeses
Add pepperoni or other decorative toppingEnjoy and feast on your experiments.Warnings* Pizza from the oven is hot. Warn the diners when served.
* Any meats added to the toppings must be cooked before baking. Raw meat or fish will not adequately cook in the pizza.Retrieved from "https://en.wikibooks.org/w/index.php?title=Cookbook:Deep_Dish_Pizza&oldid=2681759""Pepperoni pizza". Licensed under Public Domain via Wikimedia Commons - https://commons.wikimedia.org/wiki/File:Pepperoni_pizza.jpg#/media/File:Pepperoni_pizza.jpg
↧
Beverage from malunggay

 Photo by wlcutler [/caption]Here's a new refreshing way of consuming the lowly malunggay vegetable.Following the massive campaign of the several health benefits from malunggay, a line of malunggay-based products have been released in the market. There is the malunggay oil for cooking, which can be used as an alternative to olive oil; the malunggay powder that can be used as flavoring or additive to pre-processed food products such as noodles and pandesal; malunggay tablets are also made as a health supplement.Still, the list of malunggay-based products is growing because of the nutrients that can be derived from the vegetable, hence the innovation of refreshments from malunggay.After the discovery of a Japanese businessman on the health benefits from malunggay, Mr. Mitsuo Shoji developed the malunggay tea, which he claims can cure many human diseases. Malunggay in tea bags are now widely sold in the market, which are developed by Mr. Shoji's company and other companies in the private sector.Meanwhile, Dr. Edwin Balbarino of the Visayas Stae University reported that malunggay juice is extracted from the leaves of the vegetable in Leyte. The extract is mixed with lemonsito juice to produce iced candies or cold drinks for children who normally do not like eating vegetables.The malunggay, also termed as moringa, is a vitamin rich vegetable, and contains protein, iron and potassium. It contains anti-oxidants that suppress the activities of free-radicals, which causes cell death.As part of its campaign to combat poverty, malnutrition and other health disorders, the Department of Agriculture (DA) promotes the planting and consumption of moringa. Malunggay can be planted using seeds and cuttings. The development of malunggay- based products and its commercialization is likewise promoted by DA.by Ellaine Grace E. Nagpala, BAR Chronicle, October 2007 Issue (Vol. 8 No. 10)
↧
↧
Beer-Brined Ribs

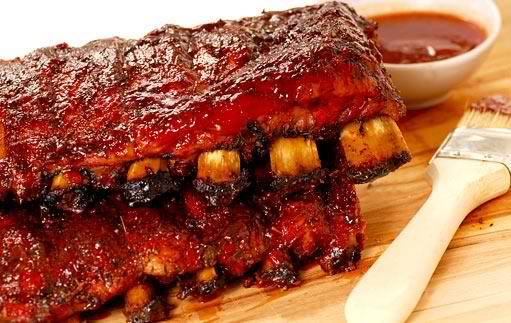 Kick off your Father's Day celebration with a barbecue party or a hefty dinner with this fantastic, fall-off-the-bone meaty delight!Beer-Brined RibsProcedureMelt 3 tablespoons coarse salt and 3 tablespoons packed brown sugar in 1/2 cup simmering water.Add 3 (12-ounce) bottles cold dark beer, 3 bay leaves, 1 whole garlic (peeled and chopped), 1 tablespoon cayenne pepper, 1 1/2 teaspoons ground black pepper, and 2 teaspoons liquid smoke flavoring (optional).Pour over 2 kilos pork ribs and let it brine overnight in the refrigerator.Remove ribs from brine, place on a baking sheet, and cover with foil. Bake in the oven at 250oF for about 3 hours or until meat is very tender.Remove foil, brush with barbecue sauce, and bake at 350oF for another 10 to 15 minutes.Make the honey-beer barbecue sauce: In a medium saucepan, cook 2/3 cup chopped onion and 1 whole garlic (chopped) in cooking oil until tender.Stir in 1 1/2 cups tomato sauce, 1 1/2 cups beer, 1/2 cup honey, 4 tablespoons Worcestershire sauce, 1 1/2 tablespoons mustard, and 1/2 teaspoons each cayenne pepper, salt, and pepper.Bring to a boil: reduce heat. Simmer, uncovered, until syrupy. Serve 6.beerRecipe: Len Santos of Feed 5000
↧
How to Make Vegetable Pickles

 Photo by avlxyz [/caption]How to Make Vegetable Pickles - Vegetable PicklingProcedure:1. Wash thoroughly carrots, cauliflower, ampalaya, singkamas, winged beans (seguidillas), red and green pepper, and green papaya.2. Peel, cut into desired sizes, and wash. Drain well and pack in sterilized culture jars.3. Boil four cups of water and one-third cup of salt.4. Cool and strain the solution with cheesecloth.5. Add one-fourth teaspoon of alum (tawas) and pour into the vegetable-packed jars. Cover and set aside. Add two tablespoons of salt for every four cups of water and one-third cup of salt daily for four days.6. After four days, wash the vegetables to reduce saltiness, and repack in the jars.7. Prepare the sweet-and-sour solution by boiling one cup water, three cups of vinegar and two-thirds cup of refined sugar.8. Cool the solution, strain and pour into the jars. Cover and set aside, adding five tablespoons of sugar for every four cups of sweet sour solution daily for three days.9. Transfer the vegetables from the culture jars after these days and arrange them in sterilized preserving jars. Boil the sweet-and-sour solution, then pour through a cheesecloth into the preserving jars.10. Half-seal and exhaust for five minutes. Seal completely and process for 10 minutes.Source: ITDI (DOST)
↧
How To Make Salted Egg In Clay Mud

 Materials: eggs (duck or chicken)
salt
clayUtensils: measuring cup
earthenwareProcedure: 1. Mix together 12 cups clay and 4 cups salt. Add water little by little as it is being mixed until an even distribution is attained.
2. Put a thick layer of this mixture at the bottom of the pot.
3. Wrap each egg in clay.
4. Arrange the eggs in the pot, about 2½ cm. apart to keep from breaking.
5. Cover again with salted clay and set aside for 2 weeks.
6. After about 2 weeks, try an egg. Cook at a heat that does not reach boiling point. If it is not yet salty enough, let the rest stay longer in the pot.
7. When the right saltiness has been reached, cook the eggs in water that does not boil up to 100°C for 15 minutes.
8. Brush with red color if desired.FRESH EGGS AND THEIR USESEggs are fresh when: 1. The yolk can be discerned if the egg is put against the light.
2. The egg lies flat on its side when put in water.
3. The yolk is firm and the white is jelly-like, not spreading when the egg is broken.Extend the freshness of eggs: 1. In storing, the pointed end should be down and the rounded end up.
2. Do not wash soiled eggs, just wipe them with a clean cloth. So, buy only eggs with clean shell.
3. Keep in a refrigerator or in a cool place.
4. Keep in a well-ventilated place. Eggs absorb the odor of the room or its surrounding when this is in a closed place.Uses of eggs in cooking: 1. To thicken soup or sauces.
2 As binder, as in making embutido, torta or relleno.
3. To lighten cakes and muffins.
4. Improve the color of the baked food like bread.
5. Used in making mayonnaise and for salads.
6. As decorations for viands.Health benefits from eggs in the diet: 1. Makes the muscles firm and the skin healthy.
2. Adds red color to the blood.
3. Gives clarity to the eyes.
4. Hastens the growth of growing kids.
5. Gives stamina for work or play.Children, pregnant women or nursing mothers as well as the aged need at least an egg a day to meet the needs of the body. Those aged 20-59 needs only about half of this requirement.Other characteristics of eggs: 1. The color of the shell has nothing to do with the nutrients they provide.
2. Balut contains more calcium and Vitamin A than ordinary eggs.
3. Eggs give much cholesterol, but should not be skipped in the diet, at least every other day.
4. In cooking, put over low fire or moderate heat, as overcooking causes hardening.
5. To remove the shell easily after cooking, put the boiled egg immediately in tap water after removing from the fire. It is also in this way that the black rim around the yolk is avoided.Source: FNRI (DOST)
Materials: eggs (duck or chicken)
salt
clayUtensils: measuring cup
earthenwareProcedure: 1. Mix together 12 cups clay and 4 cups salt. Add water little by little as it is being mixed until an even distribution is attained.
2. Put a thick layer of this mixture at the bottom of the pot.
3. Wrap each egg in clay.
4. Arrange the eggs in the pot, about 2½ cm. apart to keep from breaking.
5. Cover again with salted clay and set aside for 2 weeks.
6. After about 2 weeks, try an egg. Cook at a heat that does not reach boiling point. If it is not yet salty enough, let the rest stay longer in the pot.
7. When the right saltiness has been reached, cook the eggs in water that does not boil up to 100°C for 15 minutes.
8. Brush with red color if desired.FRESH EGGS AND THEIR USESEggs are fresh when: 1. The yolk can be discerned if the egg is put against the light.
2. The egg lies flat on its side when put in water.
3. The yolk is firm and the white is jelly-like, not spreading when the egg is broken.Extend the freshness of eggs: 1. In storing, the pointed end should be down and the rounded end up.
2. Do not wash soiled eggs, just wipe them with a clean cloth. So, buy only eggs with clean shell.
3. Keep in a refrigerator or in a cool place.
4. Keep in a well-ventilated place. Eggs absorb the odor of the room or its surrounding when this is in a closed place.Uses of eggs in cooking: 1. To thicken soup or sauces.
2 As binder, as in making embutido, torta or relleno.
3. To lighten cakes and muffins.
4. Improve the color of the baked food like bread.
5. Used in making mayonnaise and for salads.
6. As decorations for viands.Health benefits from eggs in the diet: 1. Makes the muscles firm and the skin healthy.
2. Adds red color to the blood.
3. Gives clarity to the eyes.
4. Hastens the growth of growing kids.
5. Gives stamina for work or play.Children, pregnant women or nursing mothers as well as the aged need at least an egg a day to meet the needs of the body. Those aged 20-59 needs only about half of this requirement.Other characteristics of eggs: 1. The color of the shell has nothing to do with the nutrients they provide.
2. Balut contains more calcium and Vitamin A than ordinary eggs.
3. Eggs give much cholesterol, but should not be skipped in the diet, at least every other day.
4. In cooking, put over low fire or moderate heat, as overcooking causes hardening.
5. To remove the shell easily after cooking, put the boiled egg immediately in tap water after removing from the fire. It is also in this way that the black rim around the yolk is avoided.Source: FNRI (DOST)
↧
How to Make Sugar Apple (Atis) Nectar

 Processing of Sugar Apple Nectar Choose only ripe fruits which are free from insect damage and signs of deterioration.Ingredients for 1 kg sugar apple pulp:
370 g sugar
1 g citric acidProcedure:1. Cut fruits into pieces.
2. Scrape the pulp from the skin.
3. Extract the seeds.
4. Add 2.5 l water, 370 g sugar and 1 g citric acid per kg of pulp and mix thoroughly.
5. Boil mixture for 3 minutes at 70ºC.
6. Fill pre-sterilised bottles with hot nectar by using either jug and funnel or stainless steel bucket with an outlet tap.
7. Crown cork bottles.
8. Pasteurise sealed bottles at 95ºC for 10-20 minutes.
9. Cool bottles to room temperature by immersing in cool water.
10. Label.Source: Technical Manual for Small-Scale Fruit Processors © 2004 International Centre for Underutilised Crops, UK
Processing of Sugar Apple Nectar Choose only ripe fruits which are free from insect damage and signs of deterioration.Ingredients for 1 kg sugar apple pulp:
370 g sugar
1 g citric acidProcedure:1. Cut fruits into pieces.
2. Scrape the pulp from the skin.
3. Extract the seeds.
4. Add 2.5 l water, 370 g sugar and 1 g citric acid per kg of pulp and mix thoroughly.
5. Boil mixture for 3 minutes at 70ºC.
6. Fill pre-sterilised bottles with hot nectar by using either jug and funnel or stainless steel bucket with an outlet tap.
7. Crown cork bottles.
8. Pasteurise sealed bottles at 95ºC for 10-20 minutes.
9. Cool bottles to room temperature by immersing in cool water.
10. Label.Source: Technical Manual for Small-Scale Fruit Processors © 2004 International Centre for Underutilised Crops, UK
↧
↧
Sweet Guilt-free Options for Unhealthy Sugar

 As such, artificial sweeteners and sugar substitutes can be very appealing to people looking to cut their calories or control blood sugar. Studies have shown that artificial sweeteners can be bad for the health. But nature has provided more alternatives that can give us guilt- and worry-free indulgence to our favorite sweet treats.Palm sugars: the next big thingCoconut palm sugar has garnered attention not only in the international scene but locally as well for reportedly being a low-carb sugar substitute and more nutritious than typical table sugar.Pure coconut palm sugar is a natural product made from nectar or sap of the coconut palm tree. According to studies, coco sugars has a naturally low glycemic index (GI) which has led some to claim that it is a valuable sugar substitute for people with diabetes or those looking to control blood sugar. GI is a measure of how sugar-based food impacts blood sugar, wherein high GI foods causes rapid rise in blood glucose levels in humans.Aside from the low-GI content, palm sugars also offers health benefits as it contains other elements needed by the body such as potassium, phosphorus, nitrogen, magnesium, among others.Kaong Palm SugarsAs the demand for alternative sugars increases, a team of researchers led by Dr. Lydia Manguiat of DOST-Calabarzon, has found another healthy substitute in kaong palms (Arenga pinnata). Kaong palms or sugar palms are best known for its fruit processed into salad ingredient and the popular kaong vinegar.A recent study under the “Development of Low GI Palm Sugar” Program, researchers found out that kaong sap contains a GI value of 40 which is five points higher than coco sap sugar.“While a tad higher compared to coconut sap sugar, kaong sap sugar is still categorized as low GI foods,” said Dr. Manguiat.According to Dr. Manguiat, kaong sap sugar has been in existence ever since, especially in Cavite and Quezon are. It is served as a local delicacy in the form of pakaskas. “With its distinct caramel taste, the local palm sugar can be developed into a high-value commodity, as well as its by products,” she added.According to Dr. Lorenzo Lapitan of Cavite State University, “Kaong palms have a high potential for sugar production due to the abundance of palms in the country coupled with its high sugar conversion ratio.”According to CavSU’s studies, a single kaong plant can produce 2500 liters of sap which totals roughly to about 1000 kg of sugar per hectare.Similar with the coco sap sugar, kaong palm sugar is also a very good source of many key minerals and vitamins including potassium, magnesium, protein, calcium, and iron in beneficial quantities not present in refined sugars“The program will greatly enhance the palm industry, which can help our local farmers augment their income as well as providing healthy options to sweet lovers,” Dr. Manguiat claimed.Aside from kaong, other local palms such as nipa and buri are being studied for their sugar production potential and other by products such as syrups and vinegars.Written by Arjay C. Escondo, S&T Media Service, DOST-STII
↧
How to Make Slab Bacon (Meat Processing)

 Slab BaconIngredients:A. Meat Materials
1,000 grams pork belly, skinless, boneless & rectangular in formB. Curing Mix 1. Pumping Solution for 1 kg meat
Slab BaconIngredients:A. Meat Materials
1,000 grams pork belly, skinless, boneless & rectangular in formB. Curing Mix 1. Pumping Solution for 1 kg meat| Household Measure | Ingredients | Weight (grams) |
| 1 Tablespoon | salt, refined | 15.5 |
| ½ teaspoon | Curing salt | 2 |
| 1 teaspoon | Sugar, refined | 5.5 |
| ¼ Tablespoon | Phosphate | 1.5 |
| 1 teaspoon | Bacon powder | 5 |
| 2-3 drops | Smoke flavor* | - |
| ½ tablet | Ascorbic acid, 500 mg** | - |
| ½ cup | Water, chilled | 125 |
| Household Measure | Ingredients | Weight (grams) |
| 1½Tablespoon | Salt, refined | 18 |
| 3½ Tablespoon | Sugar, refined | 35 |
| ¼ Tablespoon | Phosphate | 1.5 |
| ½ tablet | Ascorbic acid, 500 mg | - |
↧
How to Make Nata de Kalabasa

Nata de kalabasa (squash), a nata made of squash, is another way of producing healthy nata because it is rich in Vitamin A, phosphorous, calcium and minerals.
[caption id="" align="alignnone" width="500"] Photo by VasenkaPhotography [/caption]
Nata de Kalabasa
Materials:
Kalabasa peels and core Sugar
Glacial acetic acid
Ammonium sulfate
Nata starter (available at ITDI)
Procedure:
1. Wash the peels and core of kalabasa, add 3 parts water for every part of peel/core. Boil for 3 minutes
2. Strain then for every 4 cups of strained liquid from boiled peels/core, and 2/3 cup sugar and 1 ¼ tsp ammonium sulfate.
3. Heat for 15 minutes, then cool. Add 1 1/4 tsp acetic acid to adjust the acidity favorable to the growth of the nata organism then add 2/3 cup of nata starter (available at ITDI) for every 4 cups of kalabasa mixture.
4. Set aside for 10-15 days, then harvest the nata product.
5. Cook one kilo of nata in one of kilo sugar to come up with delightful dessert.
Source: ITDI (DOST)
The post How to Make Nata de Kalabasa appeared first on Business Diary Ph.
↧


