![]()
Cassava (kamoteng-kahoy in Tagalog) is the third largest source of carbohydrates in the world. Among crop plants, the cassava plant provides the highest yield of food energy and is a staple food for more than 500 million people. Cassava root is very rich in starch and contains significant amounts of calcium, dietary fiber, iron, manganese, phosphorus, potassium, vitamin B6 and vitamin C.A recent study conducted in the Philippines (one of the countries where cassava is an important crop) looked into the effects of root crops and legumes in lowering cholesterol levels among humans with moderately-raised cholesterol levels. The study showed that cassava significantly decreased total cholesterol levels, decreased low density lipoprotein (LDL) cholesterol (considered as “bad” cholesterol), and may help lower triglyceride levels due to its high total dietary fiber content.Other studies show that cassava may help support the nervous system and help alleviate stress, anxiety and irritable bowel syndrome.Beside as a food, cassava also has many benefits as a drug, such as for rheumatic, headache, fever, wounds, diarrhea, intestinal worms, dysentery, night blindness, beri-beri, and also can increase stamina. Overcoming arthritis can be done by eating the cassava or rub it on the pain area.Cassava is included as the country's major crops under the Agri-Pinoy Corn Program and is also identified under the DA's Food Staple Sufficiency Program as an alternative for rice to minimize rice importation.
![cassava recipes]() Cassava Recipes for you to try.Cassava PutoIngredients:
Cassava Recipes for you to try.Cassava PutoIngredients:pressed grated cassava
grated coconut
Procedure:Prepare local steamer using the following materials, milk can (powdered milk) bao ng niyog divided into 2 using the sides with hole, grated cassava and water. Place the bao ng niyog to sit on top of the milk can and seal with grated cassava moist in water, allow to dry before using. Pulverize pressed grated cassava and allow to air dry for 30 min to 1 hour. Set aside. Fill the steamer with water until it boils. Place the grated cassava enough to cover the baong niyog then cover with banana leaves, invert the steamed cassava until both sides are cooked. Remove from the steamer and allow the piyutu to roll in grated coconut. Divide into bite size.
Rice with Diced CassavaIngredients:1 cup rice
2 cups diced cassava
Procedures:Wash the cassava properly, peel and slice according to the desired sized. Wash the rice. Add water using the 1 cup rice: 1 cup water ratio. Mix rice and cassava. Boil until rice is cooked.
Ginataang Cassava LeavesIngredients:1 bunch young cassava leaves
1 cloves garlic
1 pc onion
½ cup shrimp
½ cup fish meat (bones removed)
¼ cup ground peanut
salt to taste
1 tbsp cooking oil
1 cup coconut milk
Procedure:Cut the leaves. Sprinkle with salt and squeeze well to extract it out. Discard remaining juice and wash the leaves with clean water. Put it in a clean pot and put the ingredients except coconut milk. Add three cups of water. Boil until tender leaves. Place the coconut milk. Flavor according to the desired taste.
Roulade Cassava LeavesIngredients:250 g young cassava leaves, boiled with water until tender
4 slices tofu, crushed
Spices 1/2 tsp pepper
1/2 tsp salt
coriander to taste
garlic
Flour pads roulade 200g wheat flour diluted with water (not too much water)
Procedure:Cassava leaves was boiled, squeezed until the water out, then cut into pieces. Mix the cassava leaves with tofu that has been crushed, stirring until blended. Give cassava leaves with spices that have been mashed, stir well. Cassava leaf shape into circle balls for ball pimpong, fist. Do it until the dough runs out. Prepare a thin flour, then give the spices a little. Dip the leaves of cassava into the flour. Fry in hot oil until yellowish. Remove and serve hot.
Steamed Cassava CupcakeIngredients:125g grated cassava, squeezed
1 tbsp wheat flour
50g grated coconut
2 eggs, yolks and whites separated
100g sugar
30g dried shrimps, roasted and pounded
½ tbsp sliced red chilies
1 tsp sliced garlic
½ tsp sugar
½ tbsp oil
Spices:200 ml cream coconut milk
1 tsp wheat flour
1 tsp milk powder
1 tsp agar agar powder or powdered seaweed extract
½ tsp salt
Procedure:Mix well cassava, wheat flour and coconut, set aside. Using electric mixer, mix eggs whites and half of sugar until firm, stop the mixer. Use the wooden spoon, mix with the cassava mixture until smooth, add the stiffed egg white and mix well. Put the dough into greased porcelain cups, fill ¾ of each cup, steam for 10 minutes, pour with sauce and sprinkle with dried shrimp, let cool and remove from the cups to serve.• To make sauce: mix all spices bring to boil and stir well.
• To make dried shrimp sprinkle: blend chili, garlic and sugar into a paste, put oil in a pan, then sauté the paste, add the shrimp, continue sautéing until golden brown.
Cassava SumanIngredients:2 cups grated cassava
1 cup thick coconut milk
1 cup young coconut, grated
¾ cup sugar
wilted banana leaves for wrapping, cut into preferred size
Procedure:Over medium heat, cook cassava and coconut milk until they form a thick mixture. Add sugar and grated coconut. Remove from heat. Put about 2 tbsp of the mixture on a banana leaf. Wrap tightly to make each suman, either in the shape of a square or a roll. Steam the suman for about 15 minutes, or until each one is firm when touched.
Cassava CheeseIngredients:1 kg of cassava
cheddar cheese
2 tsp salt
1 lt water
cooking oil
powdered flavorings to make french fries
condensed milk
Procedure:Peel the cassava, cut crosswise into pieces, wash and drain. Dissolve salt in water in a sunken container. Fry cassava until cooked but still pale, raise, directly enter into the salt water solution, allow 5 minutes. When cassava is blooming, remove from brine, fry again until yellowish. While still warm, sprinkle with sweetened condensed milk, powdered flavorings french fries, and grated cheddar cheese. Serve.
Cassava Jolly RollIngredients: 2 1/2 cup cassava grates
2 1/2 cup flour
1 cup brown sugar
1/3 cup margarine
1/4 – 1/2 cup water
1 tbsp baking powder
2 tbsp vanilla
2 pcs eggs
Procedure:Mix all the ingredients in a bowl. Roll to form dough. Spread and flatten the dough thinly, then cut to form squares (3 inch squares). Roll each square with desired filling (hotdog, cheese, caramel). Fry until golden brown. Serve hot.
Cassava EspasolIngredients:4 cups cassava grates
1 1/2 cups glucose
1 cup brown sugar
1/2 cup buko strips
6 cups coconut milk
1 tbsp vanilla
Procedure:Roast cassava grates and cassava flour then let cool. In a sauce pan or carajay, mix the coconut milk, brown sugar, glucose, and buko strips. Cook over medium fire. When the mixture boils, add the vanilla. At this time, lower the fire, then add the roasted grates. Stir constantly for 15-20 minutes or until the desired consistency in achieved. Cool the mixture then roll into desired espasol sizes. Before serving, dredge the espasol roll with the roasted cassava flour.
Cassava BallsIngredients:2 cups cassava, grated
1 onion, chopped
1 tsp fresh herbs of choice, chopped (e.g. parsley, basil, sage)
1 egg
1/4 cup cooking oil
Procedure:Combine the cassava, onion, and herbs. Lightly beat the egg and add to the cassava mixture and combine until smooth. Form mixture into small balls. Lightly fry the balls in the cooking oil, over medium temperature, until golden brown.
Note: A finely chopped fresh chili pepper or a clove of minced garlic can be used instead of the herbs.
Cassava FriesIngredients:4 large cassavas
2 tbsp olive oil
salt and pepper to season
Procedure:Peel the cassava and then divide each cassava root into 4 thick strips (1 cassava roof serves four). Lay them in a large pile on baking tray. Bring a pot of salt water to a boil and then add the cut cassava. Boil for about 30 minutes. Remove from the stove and drain all the liquid. Add all other ingredients and mix thoroughly. Preheat oven to 400°F. Bake for 15-20 minutes or until golden brown.Serving Ideas:
• Serve them hot of the oven as an appetizer.
• This is street food at its best. Served with chili sauce these tasty fries are bursting with flavor.
• They also make a nice side dish with a burger or some other protein.
Cassava NilupakIngredients:4 cups grated cooked cassava
½ cup brown sugar
2 cups buko, medium hard
½ tsp vanilla
Procedure:Combine all the ingredients, and pound once more. Mix till well blended. Arrange on a platter and cut into desired shapes.
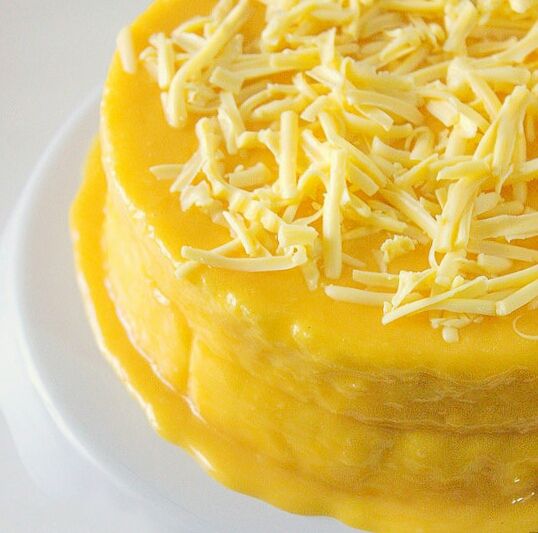
Cassava CakeIngredients:1 packet cassava, grated
¼ cup sugar
¼ bottle macapuno (12 oz jar)
2 oz butter
½ tsp vanilla
Topping ½ can condensed milk (300ml can)
grated cheese
Procedure:Mix sugar and butter until smooth. Add cassava, macapuno, coconut milk and vanilla. Stir together. Bake in 350°F oven for 30 minutes or until cooked. Pour condensed milk on top of cassava cake. Sprinkle grated cheese on top. Put back in oven top shelf until brown.
Candied CassavaIngredients1 kg cassava
600g sugar
4 cups water
1/2 cup coconut cream (optional)
1/4 tsp salt (optional)
Procedure:Peel the Cassava Roots and cut them into pieces about 7cm long. Wash and then dry the Cassava pieces. Use large saucepans add the water and the sugar and bring to the boil over a medium heat until all the sugar dissolves. Add the Cassava root pieces and continue boiling over a low heat until the cassava is cooked through and fully caramelized. Let them cook for about 2 hours. Remove from the heat and then transfer it to the serving dish. And serve either hot or cold.
Cassava CueIngredients:4 pc of cassava
1/2 cup brown sugar
1 cup cooking oil
pinch of salt
Procedure:Heat oil in pan then add cassava. Deep fry for 2 minutes. Pour in the sugar and wait until it caramelizes, once the sugar melts give it a good mix so that the cassava pieces will be coated with the melted sugar. Using a slotted spoon, remove cassava pieces, cool in a wire rack then serve.
Pichi-PichiIngredients:2 cups grated cassava
2 cups sugar
2 cups pandan water
grated coconut, for garnish
Procedure:Combine all ingredients, except the coconut. Pour into 2-9 round pans. Steam for 45 minutes or until set. Cool. Form into balls, then roll in grated coconut.
Note: To make pandan water, boil the leaves from 4 pandan stalks in 2 cups of water until fragrant. Cool.
Bibingkang CassavaIngredients:Bibingka 7 cups grated cassava
3 pcs eggs
2 cups sugar
1 cup evaporated milk
¼ cup melted butter
banana leaves
Topping 1 cup thick coconut milk
2 tbsp flour
1 can condensed milk
2 egg yolks
2 tbsp grated cheddar cheese
Procedure:Beat eggs and sugar till lemon colored. Add the rest of the ingredients. Pour into a greased 9x9 inches pan lined with banana leaves. Mix coconut milk with the flour. Add condensed milk and cook over medium heat till thick. Add egg yolks and mix well. Return to heat and cook 5 minutes more. Pour over baked bibingka. Sprinkle with the grated cheese and broil till golden brown.
Cassava Pulot at LatikIngredients:Pancake 1 ½ cup grated cassava
1 egg
½ cup evaporated milk
½ cup sugar
¼ cup butter or margarine
Pulot at Latik (Coconut Syrup) 1 cup thick coconut milk (1st extract)
1 cup thin coconut milk (2nd extract)
1 pc sinaklob or panutsa, cut up
Procedure:For coconut syrup, cook thick coconut milk over medium heat. Stir constantly until oil comes out and “latik” or coconut residue forms. Cool until “latik” turns brown. Set aside. Cook thin coconut milk and bring to boil. Add one panutsa. Stir continuously until thick then add the “latik”. Set aside. For pancakes, beat egg and stir in evaporated milk and sugar. Blend well. Add cassava and pour melted butter or margarine. Cook batter in a griddle 1/3 cup batter per pancake. Serve with “Pulot at Latik”.
Steamed Cassava Cake with Coconut Custard ToppingIngredients:1 kg cassava grated squeezed dry
1/2 cup brown sugar
1 pc coconut grated
1 cup water
1 can condensed milk
2/3 cup pinipig toasted combined with
1/3 cup desiccated coconut, toasted
Procedure:Combine brown sugar and 1 cup of the grated coconut and cassava. Put approximately 3/4 cup of the cassava mixture in the coconut shell and cover with aluminum foil. Steam for 15 minutes until cooked. Unmold to a serving dish and cover with foil while making the rest of the puto. For the topping: Add the water to the remaining grated coconut and extract the coconut milk. Combine condensed milk and coconut milk in a small saucepan. Cook over medium heat, stirring constantly, until thick. Pour mixture on top of the puto. Sprinkle pinipig-coconut mixture on top. Serve warm.
Cassava Mini BitesIngredients:2 kg cassava, peeled and grated
1 kg chicken, diced
¼ bunch cilantro
1 tbsp tomato paste
2 tsp kosher salt
2 cloves garlic, minced
1 cup red onion, diced
1 large green pepper, diced
black pepper to taste
3 cups canola oil for frying
Procedure:Boil cassava in salted boiling water until tender and squeeze out extra liquid. Season with salt and pepper and mash to paste. Saute onions, garlic, bell peppers. Add chicken. Once seared, add tomato paste and cook until chicken is tender. Remove and cool. Place a 42.5g ball of cassava in your hand (oil hand lightly so it does not stick). Place a 14g portion of chicken filling and place in center of cassava ball. Enclose the chicken and roll into a ball. Fill
a pot with 2 inches of oil heated to 3500 C and deep fry golden brown. Drain and season with salt and pepper.
Cassava Shrimp StickIngredients:½ cup grated cassava
½ cup all purpose flour
2 tbsp sugar
1 tsp baking powder
1/4 tsp salt
5 tsp powdered dried shrimp
2 tsp oil
1 pinch sodium bicarbonate
2 cups water
Procedure:Wash the cassava, peel and grate. Remove excess juice. Mix together in a bowl all the dry ingredients. Add cassava and 2 tbsp oil. Mix well. With the aid of 2 knives, cut the dough fine into sizes like mongo seeds. Add water and knead well. Spread the flour on the board and flatten the dough with the aid of a rolling pin. If necessary, add more flour to facilitate dough flattening. Cut up the flattened dough into thin sizes shape into rolls similar to cigarette sticks. Arrange them in a baking pan and cook in oven. Remove the baking pan and cool. Remove the “sticks” from the pan with the aid of a knife. Seal in a plastic bag and label or serve.
Egg Ball and Cassava PuffsIngredients:680g cassava
2 tbsp butter
6 eggs
salt and black pepper to taste
flour to roll balls
Procedure:Boil cassava and 5 eggs in salted water for about 25 to 30 mins until cassava is fork tender, drain. Mash cassava until smooth, take out the lumpy bits that cannot be mashed. Peel the eggs and set aside. Add 1 raw egg, butter, salt and pepper to the cassava, mix well. For egg balls, cover the eggs with the cassava to form a ball. The egg should be completely covered by the cassava mixture. Roll in flour and fry until golden brown. Serve these with mango chutney.
Cassava and Sweet BananaIngredients:1 medium cassava (peeled and diced into roughly 2 inch bites)
6 fresh sweet bananas, (rinsed, strained, and cut into bite sized pieces)
3/4 can coconut milk
2 pandan leaves,
7 oz (200 g) brown sugar
1/2 cup tapioca pearls (soaked in room temperature water, strained and gently rinsed)
Procedure:Boil 4 cups of water. When it has boiled, add the cassava pieces, pandan leaves, and sugar. Turn the heat to medium. Cook till the cassava is soft but still firm, then turn the heat to low. Add the coconut milk and tapioca pearls and continue cooking until the pearls are midway transparent. Add the sweet banana and cook till the tapioca pearls are completely transparent. Adjust sweetness to taste. Turn off the heat and serve.
Boiled Cassava with Garlic Lime SauceIngredients:2 cassava, cut into chunks
1½ tsp vegetable oil
4 cloves garlic, minced
1/3 cup fresh lime juice
1/3 cup chicken or vegetable stock
salt and black pepper to taste
1 onion, sliced thinly
Procedure:In a medium pot, add cassava to 6 cups boiling water. Cook for about 15 minutes or until slightly soft. Leave the cassava in the water to stay hot. In separate medium pot, heat the oil over medium heat. Add the garlic and cook until just beginning to brown. Do not let burn. Add the lime juice and broth to the pot. Boil sauce for 2 minutes. Add salt and pepper to taste. Drain the cassava. Place cassava on a plate, and put onion slices on top. Pour the sauce over the onions and cassava. Serve.
Cassava PieIngredients:1 kg of cassava
2 tbsp of margarine
3 tbsp of grated cheese
½ cup of milk
3 eggs
Filling 3 tbsp of oil
100 g sausage
250 g beef, minced
1 onion, chopped
3 tbsp of tomato sauce
chopped parsley to taste
salt to taste
pepper to taste
grated cheese for sprinkling
Procedure:Boil the cassava in salted water then knead (mashed cassava). Add margarine, grated cheese, milk and eggs. In a saucepan, fry the onion in oil add the filling ingredient. Season it to taste. Then, in an ovenproof greased container, place half the dough (cassava mixture), add the filling on top and cover with remaining cassava mixture.Sprinkle the cheese and bake at medium temperature (180
oC) for 15 minutes.
Sweetened Cassava with Tapioca PearlsIngredients:2 pcs large cassava, cut up or sliced
3 cups white sugar
5 cups water
4 cups cooked tapioca pearls
¼ cup brown sugar
Procedure:Dissolve brown sugar in ½ cup of water. Add tapioca pearls and set aside. Steam cut up cassava until tender. Heat a small pot, dissolve the white sugar in water. Simmer until it turns into simple syrup. Add cassava and mix well until cassava is coated with syrup. Serve with the sweetened tapioca pearls.
Cassava ChippyIngredients:½ kg grated cassava
½ g barbecue spice
½ g black pepper
5½ g salt
Procedure:Clean the peeled cassava, then grate. Mix together the cassava and all ingredients. Mix well until it becomes a thick paste. Spread thinly and evenly over a banana leaf or aluminum tray. Steam for about 5 minutes. Remove from steamer, place on chopping board and cut into sizes, about 4 x 1½ cm. Remove the sliced pieces and arrange in a perforated tray. Dry under the sun or dry until crispy.
Cassava Upside Down CakeIngredients:1 1/2 cup cassava flour
1/4 cup butter
1 cup brown sugar
6 pcs eggs
1 cup sugar
6 slices canned pineapples
6 halves canned peaches or mango
Procedure:Place butter, brown sugar and ½ cup syrup of the canned fruits in a deep baking pan. Place over slow fire until brown sugar is melted. Remove from the fire. Arrange fruits in the pan. Separate the yolks from whites of eggs. Beat egg whites with ½ cup sugar until stiff. Beat egg yolk until fluffy adding the other half of the sugar and two (2) tablespoons of water with calamansi juice. Beat both mixtures together. Fold in flour. Pour butter over fruit in pan. Bake in moderate oven. When done, turn upside down on cake plate.
Cassava CuchintaIngredients:1 cup cassava flour
1 cup brown sugar
1 1/2 cups water
1 tbsp lye
few drops of yellow food color or achuete
Procedure:In a mixing bowl, blend all the ingredients until thoroughly fine. Pour into cuchinta molders or ungreased muffin tins. Steam for 5 to 20 minutes. Let it cool for 5 minutes and remove from pans. Serve with grated coconut.
Cassava Butter CakeIngredients:1 ¾ cups cassava flour
1 ¾ cups wheat flour
1 cup butter
2 cups sugar
8 pcs egg less two (2) whites
1 cup diluted milk
4 tsp baking powder
Procedure:Sift flour separately; measure mix and add baking powder. Sift three (3) times. Cream butter, add sugar. When fine, beat in the egg yolk one at a time. Cream well until fine and fluffy. Add sifted flour mixture alternately with milk. Fold well-beaten egg whites in the butter mixture. Pour in well-greased nine (9) inch baking pans. Bake for 20-25 minutes.
Cassava Pinipig CookiesIngredients:3 cups cassava flour
3 cups fried pinipig
1 tsp baking powder
1 tsp vanilla (optional)
1 cup margarine
1 cup sugar
3 pcs eggs
Procedure:Sift cassava flour and baking powder. Mix with pinipig. Cream margarine and sugar. Add eggs one at a time. Continue creaming until all eggs have been added. Add flour mixture and mix well. Add vanilla. Drop by teaspoon on greased cookie sheets. Bake until brown at 177
oC (350
oF).
Cassava PolvoronIngredients:1 cup cassava flour
1/4 cup powdered milk
1/3 cup sugar
5 tbsp melted butter
Procedure:Toast cassava flour to light brown. Mix sugar and powdered milk. Melt butter and add to the mixture. Mix thoroughly and mold in polvoron molder. Wrap individually in cellophane and serve.For more information, Contact:
• Agri-Pinoy Corn Program
agriculture/" title="View all articles about Department of Agriculture here">Department of Agriculture
Diliman, Quezon City
Telefax No. (02) 926-5691
Telephone No. (02)928-8741 local 2405• Philippine Root Crop Research and Training Center
Visayas State University, Visca, Baybay City
Telefax No. (053) 335-2626
Telephone No. (053) 563-7229Source:
agriculture/" title="View all articles about Department of Agriculture here">Department of Agriculture
Agriculture and Fisheries Information Service
Elliptical Road, Diliman, Quezon City 1100
Tel. No.: 9288758 to 65 loc. 2156
DA TIN No.: 000-845-895-000
www.da.gov.ph

 Image credit to: http://chopchatnchomp.blogspot.com/[/caption]
 Photo by


 Photo by


 Photo by


 White chocolate layer • 240 grams white chocolate, chopped
• ½ cup butter
• 1/3 cup granulated sugar
• 1 tablespoon vanilla extract
• 2 eggs
• 1 ¼ cups all-purpose flour
• ¾ teaspoon saltUbe layer • ½ cup ube powder
• ¾ cup all-purpose flour
• ¼ teaspoon baking powder
• ¼ margarine (or butter), softened
• 1 cup granulated sugar
• 1 egg
• ¼ cup full cream milk (mixed with ½ teaspoon violet ube food color powder and ¼ teaspoon ube flavoring)
• ¼ cup water1. Preheat oven to 350F.
2. Line 2 pieces 9x9 square pans with foil and grease well.
3. For the white chocolate layer:Melt the white chocolate with butter in a double boiler over simmering (not boiling) water. Stir occasionally till smooth. Remove from heat.
4. Mix in sugar and vanilla extract. Set aside briefly.
5. Meanwhile, in a mixer, beat eggs on medium speed until foamy.
6. With mixer on low speed, slowly drizzle warm white chocolate mixture over eggs. Combine well.
7. In a bowl, sift together flour and salt.
8. Fold into the white chocolate mixture using rubber scrapper.
9. Divide evenly into the two prepared pans. Set aside.
10. For the ube layer: In a bowl, sift ube powder with flour and baking powder. Set aside.
11. In another bowl, cream together margarine (or butter) and sugar until light.
12. Add egg and beat well.
13. Mix in full cream milk (with ube food color and flavor) and the water.
14. Fold dry ingredients into the creamy mixture.
15. Divide into two and pour mixture gently over white chocolate l layer. Spread evenly with a metal spatula.
16. 16. Bake for 25 to 30 minutes or until toothpick inserted in the center comes out clean.
17. When done, cool on racks then decorate with more white chocolate, if desired.
18. Slice into bars or with round cookies cutters. Serve and enjoy.
White chocolate layer • 240 grams white chocolate, chopped
• ½ cup butter
• 1/3 cup granulated sugar
• 1 tablespoon vanilla extract
• 2 eggs
• 1 ¼ cups all-purpose flour
• ¾ teaspoon saltUbe layer • ½ cup ube powder
• ¾ cup all-purpose flour
• ¼ teaspoon baking powder
• ¼ margarine (or butter), softened
• 1 cup granulated sugar
• 1 egg
• ¼ cup full cream milk (mixed with ½ teaspoon violet ube food color powder and ¼ teaspoon ube flavoring)
• ¼ cup water1. Preheat oven to 350F.
2. Line 2 pieces 9x9 square pans with foil and grease well.
3. For the white chocolate layer:Melt the white chocolate with butter in a double boiler over simmering (not boiling) water. Stir occasionally till smooth. Remove from heat.
4. Mix in sugar and vanilla extract. Set aside briefly.
5. Meanwhile, in a mixer, beat eggs on medium speed until foamy.
6. With mixer on low speed, slowly drizzle warm white chocolate mixture over eggs. Combine well.
7. In a bowl, sift together flour and salt.
8. Fold into the white chocolate mixture using rubber scrapper.
9. Divide evenly into the two prepared pans. Set aside.
10. For the ube layer: In a bowl, sift ube powder with flour and baking powder. Set aside.
11. In another bowl, cream together margarine (or butter) and sugar until light.
12. Add egg and beat well.
13. Mix in full cream milk (with ube food color and flavor) and the water.
14. Fold dry ingredients into the creamy mixture.
15. Divide into two and pour mixture gently over white chocolate l layer. Spread evenly with a metal spatula.
16. 16. Bake for 25 to 30 minutes or until toothpick inserted in the center comes out clean.
17. When done, cool on racks then decorate with more white chocolate, if desired.
18. Slice into bars or with round cookies cutters. Serve and enjoy.

 Photo by
 Corned PorkMeat Material:1 kg Pork lean meat, cubed (1" x 1/2")Seasoning/Curing Ingredients:1 Tablespoon Salt, refined (15.5g)
1 teaspoon Curing salt (3.9g)
1 ¼ Tablespoon Sugar, refined (13.75g)
1 teaspoon Phosphate (3g)
1 ¼ teaspoon Vitamin C powder (0.75g)
1 cup Water, chilledCooking Ingredients:1 tsp Nutmeg (2g)
1 tsp Corned beef seasoning (2.8g)
1 tsp Garlic powder (2.3g)
1/2 tsp MSG (add after flaking) -(2g)
2 tbsp Trimix* (after cooking) -(12.6g)
1 tsp Carageenan (3g)
2 cups Water, chilled* Add after flaking.
** For every 300 grams broth, add 2 Tablespoon Trimix and 1 teaspoon carageenan previously dissolved in ¼ cup water and boil until it thickens. Add it to 700 grams flaked lean meat to make a 1000-gram product.
NOTE: Remove liquid after curingProcedure1. Select good quality materials.
2. Cube the meat into 1 x % inch
3. Prepare the cover pickle (40° salinity).
4. Immerse the raw materials into the cover pickle.
5. Cure at room temperature for 8 to 10 hours or refrigerate (34°-36°F) for 1 to 2 days.
6. Cook in pressure cooker for 45 to 60 minutes at 15 psi or in open fire for 4 to 6 hours. Mix the cooking ingredients with 2 cups water.
7. Flake. Separate lean from stock (sabaw).
8. Pack in polyethylene bags and keep in freezer.source: DA-ATI, ITCPH-Lipa
Corned PorkMeat Material:1 kg Pork lean meat, cubed (1" x 1/2")Seasoning/Curing Ingredients:1 Tablespoon Salt, refined (15.5g)
1 teaspoon Curing salt (3.9g)
1 ¼ Tablespoon Sugar, refined (13.75g)
1 teaspoon Phosphate (3g)
1 ¼ teaspoon Vitamin C powder (0.75g)
1 cup Water, chilledCooking Ingredients:1 tsp Nutmeg (2g)
1 tsp Corned beef seasoning (2.8g)
1 tsp Garlic powder (2.3g)
1/2 tsp MSG (add after flaking) -(2g)
2 tbsp Trimix* (after cooking) -(12.6g)
1 tsp Carageenan (3g)
2 cups Water, chilled* Add after flaking.
** For every 300 grams broth, add 2 Tablespoon Trimix and 1 teaspoon carageenan previously dissolved in ¼ cup water and boil until it thickens. Add it to 700 grams flaked lean meat to make a 1000-gram product.
NOTE: Remove liquid after curingProcedure1. Select good quality materials.
2. Cube the meat into 1 x % inch
3. Prepare the cover pickle (40° salinity).
4. Immerse the raw materials into the cover pickle.
5. Cure at room temperature for 8 to 10 hours or refrigerate (34°-36°F) for 1 to 2 days.
6. Cook in pressure cooker for 45 to 60 minutes at 15 psi or in open fire for 4 to 6 hours. Mix the cooking ingredients with 2 cups water.
7. Flake. Separate lean from stock (sabaw).
8. Pack in polyethylene bags and keep in freezer.source: DA-ATI, ITCPH-Lipa

 Lourdes S. Rivera, the Guru of Meat Processing in the Philippines is introducing a new type of healthy ham with soy protein named star ham.Homemade Star HamMeat material: 700 gms Pork pique, boneless, skinless ground coarsely
300 gms Pork backfat ground coarselyIngredients:Curing mix:1 tbsp. Salt refined
1/2 tsp. Curing salt
1 tbsp. Phosphate
1/4 tsp. Vitamin C powder
1/2 cup Chilled water*To dissolve the above ingredientsExtenders:1 tbsp. Isolate
1 tsp. Carageenan
1/2 tsp. Prop Plus
1/4 cup Chilled waterSeasonings:2 1/4 tbsp. Sugar, refined
1/2 tsp. Meat enhancer
1/2 tsp. Vetsin (MSG)
1 tsp. Cinnamon powder
1 tbsp. Ham spice
1 tsp. BF BlendProcedure:1. Chill meat and backfat before grinding. Grind pork and backfat using a coarse plate.2. Measure or weigh all the ingredients. Mix meat with backfat and mix with curing mix until tacky. Add hydrated extenders little by little until well blended. Finally add the seasonings. Mix well.3. Put this mixture in ham molder and steam for 1 hour. Cool.4. Remove ham from mould package (pear shaped or star shaped).5. Caramelize with brown sugar. Cool. Package.Yield: 1.0 kgSource: MARID, 2007, Lourdes Rivera
Lourdes S. Rivera, the Guru of Meat Processing in the Philippines is introducing a new type of healthy ham with soy protein named star ham.Homemade Star HamMeat material: 700 gms Pork pique, boneless, skinless ground coarsely
300 gms Pork backfat ground coarselyIngredients:Curing mix:1 tbsp. Salt refined
1/2 tsp. Curing salt
1 tbsp. Phosphate
1/4 tsp. Vitamin C powder
1/2 cup Chilled water*To dissolve the above ingredientsExtenders:1 tbsp. Isolate
1 tsp. Carageenan
1/2 tsp. Prop Plus
1/4 cup Chilled waterSeasonings:2 1/4 tbsp. Sugar, refined
1/2 tsp. Meat enhancer
1/2 tsp. Vetsin (MSG)
1 tsp. Cinnamon powder
1 tbsp. Ham spice
1 tsp. BF BlendProcedure:1. Chill meat and backfat before grinding. Grind pork and backfat using a coarse plate.2. Measure or weigh all the ingredients. Mix meat with backfat and mix with curing mix until tacky. Add hydrated extenders little by little until well blended. Finally add the seasonings. Mix well.3. Put this mixture in ham molder and steam for 1 hour. Cool.4. Remove ham from mould package (pear shaped or star shaped).5. Caramelize with brown sugar. Cool. Package.Yield: 1.0 kgSource: MARID, 2007, Lourdes Rivera

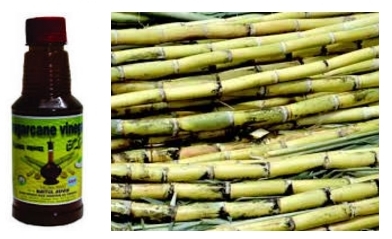 Moreover, vinegar can be more than an addition to any dish--it can be a source of income---a promising business venture for any Filipino who is interested in making more money at home.The Sugar Regulatory Administration (SRA) has packaged a fast, easy-to-follow and cost effective technology on making vinegar. This technology produces naturally fermented sugarcane vinegar from sugarcane juice in just two weeks.
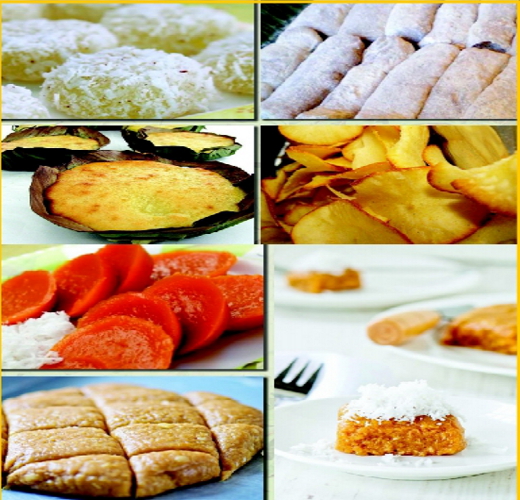


 Photo by
 1. Cataract, colds, cough, sore throat, sinusitis, anemia, arthritis, rheumatism and even athlete's foot and pimples. Taking in pure honey regularly may also minimize colds, cough, sore throat and sinusitis. Chewing and finally swallowing honey soothes the throat and nostrils.
2. Honey is also good for anemic persons or for those who have low blood pressure. It hastens the production of red blood cells.
3. Pure honey contains lecithin which dilutes or dissolves the cholesterol in the heart's blood vessels. People who use to eat fatty foods may likely suffer from heart disorders mainly due to cholesterol accumulating in the heart's blood vessels. When cholesterol gets thicker, supply of blood to and from the heart becomes limited, resulting in heart attack.
4. Honey can also be used as a facial cleansing cream. It prevents pimples. It can also cure athlete's foot (ringworm of the feet), a contagious disease caused by fungus. Before going to bed, wash your feet with soap and lukewarm water. Let your foot dry and then apply honey over the infected portion and wrap with bandage. The following
morning, remove the bandage and wash your feet clean. Do this every night until your feet heals.
Pureness of honey: Pure honey contains 7.7 percent moisture. This can be determined by using a thermometer. Another simple method is to use an onion skin coupon bond. Drop a little amount of honey on the paper. If it tears the paper, then the honey contains more than enough water and is therefore adulterated. If not, it is pure honey. Also, soak the head of a match stick in honey for five minutes. Thereafter, strike the match. If it sparks, the honey is pure.
Source: Phil. Farmer's Journal September 1980
1. Cataract, colds, cough, sore throat, sinusitis, anemia, arthritis, rheumatism and even athlete's foot and pimples. Taking in pure honey regularly may also minimize colds, cough, sore throat and sinusitis. Chewing and finally swallowing honey soothes the throat and nostrils.
2. Honey is also good for anemic persons or for those who have low blood pressure. It hastens the production of red blood cells.
3. Pure honey contains lecithin which dilutes or dissolves the cholesterol in the heart's blood vessels. People who use to eat fatty foods may likely suffer from heart disorders mainly due to cholesterol accumulating in the heart's blood vessels. When cholesterol gets thicker, supply of blood to and from the heart becomes limited, resulting in heart attack.
4. Honey can also be used as a facial cleansing cream. It prevents pimples. It can also cure athlete's foot (ringworm of the feet), a contagious disease caused by fungus. Before going to bed, wash your feet with soap and lukewarm water. Let your foot dry and then apply honey over the infected portion and wrap with bandage. The following
morning, remove the bandage and wash your feet clean. Do this every night until your feet heals.
Pureness of honey: Pure honey contains 7.7 percent moisture. This can be determined by using a thermometer. Another simple method is to use an onion skin coupon bond. Drop a little amount of honey on the paper. If it tears the paper, then the honey contains more than enough water and is therefore adulterated. If not, it is pure honey. Also, soak the head of a match stick in honey for five minutes. Thereafter, strike the match. If it sparks, the honey is pure.
Source: Phil. Farmer's Journal September 1980

 Photo by